
🏠 Home > 🗺️ Recipes > 🍱 Snacks > 🇨🇴 Colombia Snacks > 🍱 1.Pandebono (Colombian Cheese Bread) , 2.Arepas de Queso (Corn Cakes with Cheese) , 3.Patacones (Fried Green Plantains)
🍱 Crispy, Cheesy, and Gluten-Free: The Ultimate Colombian Snack Guide
Published by Supakorn | Updated: February 2026
Hey there, food lover! If you’ve been searching for snacks that are naturally gluten-free without tasting like cardboard, you’ve just hit the jackpot. While the rest of the world is busy trying to figure out how to make bread without wheat, Colombia has been doing it effortlessly for centuries.
In Colombia, the "king of the kitchen" isn't wheat—it's corn and cassava (yuca). Because these two staples are naturally gluten-free, a huge chunk of Colombian street food and bakery treats are safe for those with gluten sensitivities. These snacks are gaining massive popularity in international cities like New York, London, and Tokyo because they are incredibly satisfying, chewy, and packed with flavor.
In this post, I’m going to walk you through 3 of the most famous, most addictive Colombian snacks that you can easily make at home. We’re talking about:
💥 • 1.Pandebono (Colombian Cheese Bread) — The Legendary Pandebono: A cheesy, pillowy bread that will change your life.
💥 • 2.Arepas de Queso (Corn Cakes with Cheese) — The Versatile Arepa de Queso: The golden corn cake that is basically a hug in food form.
💥 • 3.Patacones (Fried Green Plantains) — The Crunchy Patacones: Double-fried green plantains that beat potato chips any day of the week.
Ready to fill your kitchen with the scent of melting cheese? Let’s get into it!
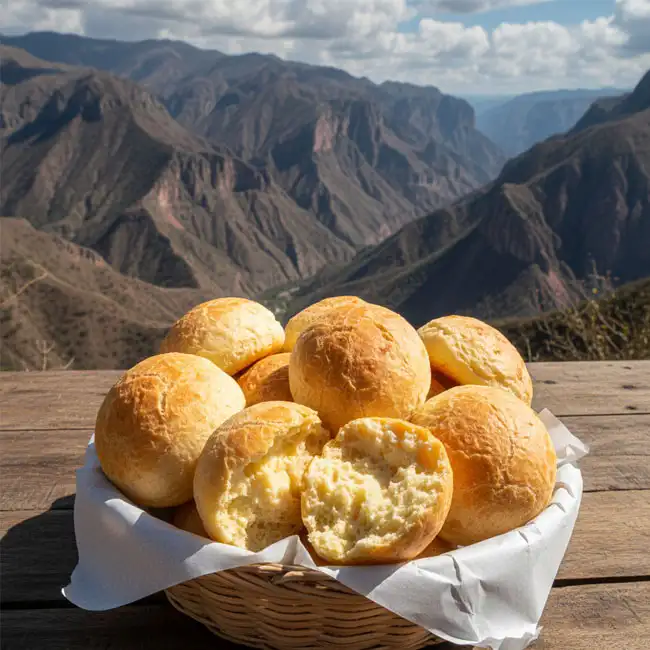
🧀 Recipe 1: Pandebono (Colombian Cheese Bread)
🥖 About this Recipe
Pandebono is arguably the most famous snack from the Valle del Cauca region. It’s a small, round bun that manages to be crispy on the outside and incredibly chewy on the inside. The secret is the combination of cassava starch and corn flour. Most people are shocked to learn it has no wheat at all! It’s the perfect companion for your morning coffee or afternoon tea.
📝 Ingredients & Measurements
• Cassava starch (Yuca starch): 2 cups (250 grams)
• Pre-cooked corn meal (like P.A.N. white): 1/4 cup (35 grams)
• Feta cheese (crumbled): 1.5 cups (approx. 180 grams)
• Queso Fresco or Mozzarella (grated): 1.5 cups (approx. 180 grams)
• Egg: 1 large unit
• Sugar: 1 tablespoon
• Salt: A pinch (adjust based on how salty your feta is)
• Milk: 2 to 4 tablespoons (added slowly as needed)
👩🍳 Step-by-Step Instructions
1.Mix the Dry Ingredients: In a large bowl, whisk together the cassava starch, corn meal, sugar, and salt.
2.Add the Cheese: Add both the crumbled feta and the grated mozzarella. Use your hands to rub the cheese into the flour until it looks like coarse crumbs.
3.Bind it Together: Add the egg and start kneading.
4.The Milk Trick: Add the milk one tablespoon at a time. You want a dough that is soft, pliable, and doesn't stick to your hands. If it's too dry, it will crack; if it's too wet, it won't rise.
5.Shape: Divide the dough into 12 to 15 equal pieces and roll them into smooth balls.
6.Bake: Place them on a baking sheet with parchment paper. Bake in a preheated oven at 400°F (200°C) for about 15 to 20 minutes until they are puffed up and have a light golden tint.
7.Eat Hot: Pandebonos are best eaten within minutes of leaving the oven!
💡 Tips & Mistakes to Avoid
• The Cheese Ratio: Traditionally, we use Queso Costeño, which is very salty and dry. Feta is the best substitute, but make sure to crumble it very finely so you don't have large lumps.
• Over-baking: If you leave them in too long, they will become hard like rocks. Take them out while they are still pale gold.
• The Dough Texture: If the dough feels "sandy," keep kneading! The warmth of your hands helps the cheese and starch bond together.
• Flour Choice: Ensure you use "Pre-cooked" corn meal (Masarepa), not traditional cornmeal used for cornbread, or the texture will be gritty.
❓ FAQ
Q1.Can I freeze the dough?
Yes! Shape them into balls and freeze. You can bake them straight from the freezer; just add 5 minutes to the bake time.
Q2.Why did my Pandebonos deflate?
Usually, this happens if the oven wasn't hot enough or if there was too much moisture in the dough.
Q3.Is there a dairy-free version?
It’s tough because the cheese is 50% of the recipe, but some people use vegan feta and vegan mozzarella with decent results.
📝 Summary
Pandebono is a gluten-free miracle. It’s cheesy, satisfying, and has a unique "bounce" to the texture that you just can't get with wheat. It’s a guaranteed crowd-pleaser!

🌽 Recipe 2: Arepas de Queso (Corn Cakes with Cheese)
🥙 About this Recipe
If Colombia had a "national bread," it would be the Arepa. While there are dozens of varieties, the Arepa de Queso is the ultimate comfort snack. It’s a thick corn patty with cheese mixed directly into the dough and sometimes stuffed with even more cheese. It’s naturally gluten-free and can be eaten for breakfast, lunch, or a midnight snack.
📝 Ingredients & Measurements
• Pre-cooked white corn meal (Masarepa): 2 cups (300 grams)
• Warm water: 2.5 cups (approx. 600 ml)
• Shredded Mozzarella or Monterey Jack: 1.5 cups
• Butter (melted): 2 tablespoons
• Salt: 1 teaspoon
• Vegetable oil: 1 tablespoon (for frying)
👩🍳 Step-by-Step Instructions
1.Hydrate: In a large bowl, mix the warm water, salt, and melted butter.
2.Incorporate: Slowly add the corn meal into the water while stirring with your hand to prevent lumps.
3.Knead: Let the mixture sit for 5 minutes to fully hydrate. Then, knead it for a minute until it’s smooth.
4.Add Cheese: Fold in the shredded cheese and knead until evenly distributed.
5.Shape: Form the dough into balls about the size of an orange. Flatten them between your palms to create discs about 1/2 inch thick.
6.The "Seal": Smooth out the edges with a little water to prevent cracking during cooking.
7.Grill/Fry: Heat a skillet or griddle over medium heat with a tiny bit of oil. Cook the arepas for about 5-7 minutes per side until they have golden-brown "beauty spots."
8.Serve: Serve hot as they are, or slice them open and spread a little more butter inside.
💡 Tips & Mistakes to Avoid
• The Crack Test: If the edges of your arepa crack when you flatten it, the dough is too dry. Add a splash more water and re-knead.
• Don't Rush: Cooking on medium-low heat is key. If the heat is too high, the outside will burn before the cheese inside has melted.
• The "Hollow" Sound: Tap the arepa with your finger; if it sounds slightly hollow, it’s done!
• Stuffed Version: For extra decadence, make two thinner discs, place a thick slice of cheese in the middle, and pinch the edges to seal them before cooking.
❓ FAQ
Q1.What is Masarepa?
It is corn that has been cooked and then ground. Do not use "Masa Harina" (used for tortillas) or regular cornmeal, as they won't work for this recipe.
Q2.Can I use a toaster?
Yes! Once they are cooked and cooled, you can pop them in a toaster to reheat them and get them crispy again.
Q3.Are these healthy?
They are a great source of complex carbs and are much less processed than most store-bought breads.
📝 Summary
The Arepa de Queso is the ultimate canvas for flavor. It’s simple, rustic, and incredibly filling. Once you master the basic dough, the possibilities are endless!

🍌 Recipe 3: Patacones (Fried Green Plantains)
🍟 About this Recipe
Patacones (also called Tostones in other countries) are the Colombian version of French fries, but better. Made from green (unripe) plantains, they are starchy, salty, and have an incredible crunch. They are naturally vegan and gluten-free. They are served with everything from fried fish to a simple side of hogao (tomato and onion sauce).
📝 Ingredients & Measurements
• Green plantains (must be green, not yellow!): 2 large units
• Vegetable oil: Enough for deep frying (approx. 2 cups)
• Salt: To taste
• Garlic powder (optional): 1/2 teaspoon
• Cold water: 1 cup (for the "secret soak")
👩🍳 Step-by-Step Instructions
1.Peel: Cut the ends off the plantain. Score the skin lengthwise with a knife and peel it off with your fingers.
2.First Fry: Cut the plantain into thick rounds (about 1 to 1.5 inches thick). Fry them in oil at medium heat 325∘F or 160∘C for about 3-4 minutes until they are soft and light yellow, but not brown.
3.The Smash: Remove the rounds from the oil. While they are still warm, place them between two pieces of parchment paper or a plastic bag. Use a heavy plate or a "pataconera" to smash them flat until they are about 1/4 inch thick.
4.The Secret Soak: Dip the smashed plantain quickly into cold water mixed with salt and garlic powder. Pat it dry immediately with a paper towel. This makes the outside extra crispy!
5.Second Fry: Increase the oil heat to 375°F or 190°C°. Fry the smashed plantains for 2-3 minutes until they are golden brown and very crispy.
6.Drain: Place on paper towels and sprinkle with extra salt while still hot.
💡 Tips & Mistakes to Avoid
• Stay Green: If the plantain has yellow spots, it will be sweet and soft. For authentic patacones, the peel must be completely green.
• The Smash Timing: Smash them while they are hot! If they cool down after the first fry, they will crack and crumble instead of flattening.
• Water Safety: Be very careful when dipping in water and then putting back in oil. Always pat them dry thoroughly to avoid oil splatters.
• Thickness: Don't smash them too thin, or they will become like crackers. You want a little bit of "meat" in the middle.
❓ FAQ
Q1.Can I air fry these?
You can, but they won't be as crispy. Spray them generously with oil for both the first and second "fry" stages.
Q2.What do I serve them with?
Everything! Guacamole, hogao, shredded meat, or even just a squeeze of lime.
Q3.Are plantains just big bananas?
No! They are much starchier and must be cooked to be enjoyed. They taste more like a potato than a banana when green.
📝 Summary
Patacones are the king of crunchy sides. They are satisfying, salty, and provide a wonderful tropical flair to any meal. Plus, they are a fun "interactive" food to make with friends!
🏁 Final Thoughts
There you have it—three incredible Colombian snacks that prove a gluten-free diet doesn't have to be boring. In fact, these recipes are so good that your friends who can eat gluten won't even notice the difference!
Starting with these snacks is a fantastic way to explore Colombian culture from your own kitchen. They use simple ingredients that you can find in almost any supermarket nowadays, and the techniques are easy to learn with a little bit of practice.
I really hope you give these a try. Maybe start with the Arepas for a weekend breakfast, then move on to the Pandebono when you want something cheesy and impressive. Don't be afraid to make a mess—half the fun is kneading that dough and smashing those plantains! Once you've tried them, I’d love to hear which one became your favorite. Happy snacking!
| 🇨🇴 🍱 < Back |