
🏠 Home > 🗺️ Recipes > 🍱 Snacks > 🇩🇴 Dominican Republic Snacks > 🍱 1.Yaroa (Layered Potato and Meat Casserole) , 2.Empanadas (Baked or Fried Turnovers) , 3.Bolitas de Yuca (Cheesy Yuca Fritters)
🍱 Mastering the Picadera: Three Iconic Dominican Recipes Your Family Will Obsess Over
Published by Supakorn | Updated: February 2026
🌴 The Picadera Tradition: Why Dominican Snacks Are the Ultimate Party Food
Hey there, food adventurer! You know that feeling when you walk into a party and see a table piled high with delicious, colorful small bites? That’s the magic of the picadera in the Dominican Republic. It’s more than just an appetizer spread; it’s a social centerpiece—a relaxed, generous way to show hospitality and gather your favorite people around incredible food.
While you might already be familiar with iconic Dominican main courses like mangu or sancocho, the real soul of Dominican social eating lies in these handheld, savory treats. The picadera is all about variety, convenience, and bold flavors that perfectly blend indigenous Taino, African, and European influences. They are designed to be shared, eaten standing up, and often dipped in a simple, creamy sauce.
The great news? You don't need a plane ticket to bring this vibrant street-food culture right into your own kitchen. Many of these recipes rely on readily available ingredients and simple techniques, making them perfect for boosting your confidence in Caribbean cooking. And because they're small, savory, and satisfying, they are a guaranteed hit with guests of all ages—a true testament to the power of shareable food.
In this massive deep-dive, we're not just giving you recipes; we’re walking you through the cultural significance and the foolproof techniques to master three of the most beloved Dominican snacks. Get ready to learn the secrets behind:
🤩 1.Yaroa (Layered Potato and Meat Casserole)
🤩 2.Empanadas (Baked or Fried Turnovers)
🤩 3.Bolitas de Yuca (Cheesy Yuca Fritters)
Let's dive in and transform your next gathering into a genuine Caribbean feast!

🍟 Recipe 1: Yaroa (Layered Potato and Meat Casserole) – The Ultimate Layered Potato and Meat Casserole
Imagine the coziest, cheesiest, most satisfying comfort food you can think of—now give it a tropical upgrade. That’s Yaroa! Born in the Dominican city of Santiago de los Caballeros, Yaroa started as a popular street food, often sold late at night. It’s a beautifully simple concept: layers of potato (usually French fries) and richly seasoned meat, all drowning under a mountain of melted cheese and creamy sauces.
🧡 About this Recipe: Comfort Food Meets Caribbean Spice
Yaroa is truly a modern Dominican masterpiece. It takes familiar, comforting elements—like crispy potatoes and melted cheese—and elevates them with the deep, savory flavors of Caribbean guisada (stewed/braised) meat. The key is the layering: first the base, then the spiced ground beef or chicken, followed by a generous hand of cheese and the obligatory, delicious drizzle of ketchup and mayonnaise.
Traditionally, Yaroa can be made with a base of French fries (papas fritas) or mashed sweet plantain (platano maduro), which offers a wonderful sweet-and-savory twist. For a quick appetizer, using pre-made frozen French fries is a fantastic shortcut. This recipe breaks down how to create the most flavorful seasoned meat possible—the true star of the show!
📝 Ingredients & Measurements
This recipe is structured to make a batch of highly flavorful seasoned meat, enough for 6–8 generous appetizer-sized servings of Yaroa.
For the Richly Seasoned Meat Filling (Carne Guisada Style):
• 1.5 Pounds of Ground Beef (Use a lean blend, like 85/15, for the best flavor without too much grease).
• 1 medium Red Onion, finely diced (This adds a sharp freshness when cooking).
• 4 cloves of Garlic, minced (The more the merrier for Dominican seasoning!).
• 1/2 cup of Tomato Sauce (Or tomato paste mixed with a little water for color and depth).
• 2 tablespoons of Dominican Sofrito (If you don't have sofrito, blend 1/4 cup each of bell pepper, cilantro, and onion).
• 1 teaspoon of Dried Oregano (A must-have spice in the DR).
• 1/2 teaspoon of Sazón with Annatto (Or paprika for color; this gives it that signature red hue).
• 1 tablespoon of White Vinegar (This brightens up the meat flavor considerably).
• Salt and Pepper to taste (Start with 1 teaspoon of salt and adjust after simmering).
For the Base and Topping:
• 2 Pounds of French Fries (One large bag of your favorite frozen fries works perfectly).
• 3 cups of Shredded Cheese (A mix of Cheddar and Mozzarella gives the best melt and flavor profile).
• Ketchup, for drizzling (Don't skip it, it's traditional!).
• Mayonnaise, for drizzling (Again, very traditional and adds creaminess).
👩🍳 Step-by-Step Instructions
Layering is the name of the game, but the meat seasoning is what truly makes this dish shine!
1.Prep the Base: Bake or fry your French fries according to the package directions until they are piping hot and crispy. Salt them lightly immediately after they come out of the heat. Set them aside and preheat your oven to the broiler setting 400°F ( 200°C).
2.Cook the Meat: In a large, heavy-bottomed skillet over medium-high heat, brown the ground beef. Break it up well with a spoon. Drain off any excess grease thoroughly.
3.Build the Flavor Base: Add the diced red onion and minced garlic to the meat, sautéing for about 3 minutes until the onions soften and the garlic is fragrant.
4.Season and Simmer: Stir in the sofrito, dried oregano, Sazón, and vinegar. Cook for 1 minute until fragrant. Next, stir in the tomato sauce and add about 1/4 cup of water. Season with salt and pepper.
5.Finish the Meat: Reduce the heat to low and let the meat simmer for 10–15 minutes. You want the sauce to thicken into a rich glaze that coats the meat—it should not be watery. Remove from heat.
6.Assemble the Yaroa: Use individual oven-safe bowls, small aluminum trays, or a single casserole dish.
• Layer 1 (The Foundation): Spread an even layer of hot French fries on the bottom.
• Layer 2 (The Sauce): Drizzle a light zig-zag of both ketchup and mayonnaise over the fries (this adds moisture and classic street flavor).
• Layer 3 (The Heart): Spoon a generous layer of the seasoned ground beef mixture over the sauce.
• Layer 4 (The Blanket): Cover the entire top completely with a thick layer of shredded cheese.
7.Broil and Melt: Place the assembled Yaroa under the preheated broiler for 3–5 minutes, watching very closely. The goal is for the cheese to be completely melted, bubbly, and slightly golden brown.
8.Serve Hot: Carefully remove the Yaroa. Drizzle with a final, generous squeeze of ketchup and mayonnaise. Serve immediately with spoons for digging in!
💡 Tips & Mistakes to Avoid
• Tip for the Base: Want an authentic, more complex taste? Replace the fries with mashed boiled and fried green plantains (Mashed Tostones) or the popular mashed sweet plantain (platano maduro) for a sweet/savory base.
• Mistake to Avoid: Rushing the Meat: Don't under-season or leave the meat watery. The flavor of the Yaroa relies entirely on the meat being intensely seasoned and reduced to a savory glaze.
• Broiler Watch: The broiler is very fast! Cheese can go from perfect to burnt in seconds. Do not walk away.
• Family Style: If serving family-style, assemble the Yaroa in a large, clear glass baking dish so the beautiful layers are visible!
❓ FAQ
Q: Can I make Yaroa vegetarian?
A: Absolutely! Replace the meat layer with well-seasoned, cooked black beans mixed with corn, or a sauté of mushrooms and peppers seasoned with Dominican spices.
Q: Is there a substitute for Sazón?
A: The main purpose of Sazón here is color (annatto/achiote). You can substitute it with paprika mixed with a tiny pinch of cumin and oregano, but the color might not be as vibrant.
Q: Can I use different cheeses?
A: Yes, use any good melting cheese. Swiss, Monterey Jack, or even a smoked Gouda can add a unique twist, but the classic Mozzarella-Cheddar blend is fail-safe.
✨ Summary
Yaroa is the definitive Dominican comfort food—it’s savory, cheesy, and deeply satisfying. It’s the perfect, hearty appetizer that acts as a mini-meal and is always a conversation starter!

🥟 Recipe 2: Empanadas (Baked or Fried Turnovers) – Crispy Baked or Fried Turnovers
If there’s one item you absolutely must have on your picadera platter, it’s the Empanada. These beautiful, savory turnovers are a culinary staple across the Caribbean, but the Dominican version is treasured for its signature thin, crispy crust and deeply flavored fillings. They are the ultimate handheld party food!
🌟 About this Recipe: The Iconic Handheld Pocket
The Empanada is simply an ideal appetizer. It’s a pocket of dough, folded over a delicious savory filling, then sealed and cooked until golden and flaky. Dominican Empanadas are traditionally filled with either picadillo (highly seasoned ground beef), shredded chicken, or cheese.
While some traditional Dominican Empanadas (like empanaditas de catibía) use a cassava-based dough for extra crunch, the most common and easiest version to make at home uses thin, flaky wheat-flour dough discs. They can be either baked or fried, but for maximum crunch and authenticity, deep-frying is the way to go! This recipe focuses on the classic picadillo filling.
📝 Ingredients & Measurements
This recipe makes the same flavorful meat filling as the Yaroa, which is perfect because you can make one big batch of picadillo and use it for both! This recipe yields about 12 Empanadas.
For the Ground Beef Filling (Picadillo):
• 1 Pound of Ground Beef (leaner works best to avoid greasy leakage).
• 1/2 medium Red Onion, finely diced.
• 1/4 cup of Dominican Sofrito (or a mix of tomato paste, peppers, and herbs).
• 1 tablespoon of White Vinegar (for essential tangy flavor).
• 1 teaspoon of Dried Oregano and 1/2 teaspoon of Sazón.
• Salt and Pepper to taste.
For the Dough and Frying:
• 1 package (12 discs) of Goya Frozen Empanada Dough Discs (or use puff pastry sheets cut into circles).
• Water (for sealing the edges).
• Vegetable Oil (about 2 inches deep, for frying).
👩🍳 Step-by-Step Instructions
A proper seal on the dough is absolutely critical to prevent the filling from bubbling out into the oil!
1.Prepare the Filling: Cook the ground beef and season it following the exact steps 2-5 from the Yaroa recipe until you have a rich, dry, and flavorful picadillo. Let the filling cool completely! This is non-negotiable for a good seal.
2.Prep the Dough: Allow the frozen dough discs to thaw fully, but keep them cool and covered so they don't dry out.
3.Fill the Discs: Lay a dough disc flat. Spoon just about 1 tablespoon of the cold picadillo filling onto one half of the dough circle. Remember, less is more to ensure a proper seal.
4.Seal and Crimp: Moisten the edges of the dough lightly with water. Fold the dough over the filling to create a half-moon shape. Press the edges down firmly with your fingers, then use a fork to crimp the edges tightly shut.
5.Cook the Empanadas:
• Frying (Recommended): Heat the oil in a deep pan to 350∘F / 175∘C. Carefully place 3-4 Empanadas at a time into the hot oil. Fry for 3–4 minutes per side, turning until they are deep golden brown and beautifully crispy.
• Baking (Lighter Option): Preheat your oven to 400°F or 200°C. Place Empanadas on a baking sheet and brush lightly with an egg wash (or just oil). Bake for 15–20 minutes until golden and flaky.
6.Drain and Serve: Remove the cooked Empanadas and place them on a rack or paper towels to drain excess oil. Serve them piping hot with a simple dipping sauce!
💡 Tips & Mistakes to Avoid
• Tip for Sealing: Press out all the air around the filling before crimping. Air pockets expand when heated and can blow out your seal.
• Mistake to Avoid: Hot Filling: This deserves repeating—never, ever fill the dough with warm or hot filling! The heat starts cooking the dough prematurely, making it soggy and impossible to seal.
• Dough Quality: If you want extra flaky Empanadas, opt for dough labeled for "turnovers" or "empanadas" rather than basic pie crust dough.
• Serving Tip: Serve with a simple squeeze of lime juice or a homemade spicy mayo (mayoketchup with a dash of hot sauce).
❓ FAQ
Q: Can I freeze unbaked Empanadas?
A: Absolutely! This is a great way to meal prep. Assemble them fully, freeze on a tray until solid, then transfer to a freezer bag. Fry or bake them directly from frozen, adding a few extra minutes to the cooking time.
Q: What is the best filling for beginners?
A: Cheese! A simple cube of Mozzarella is easy to seal and requires no pre-cooking, making it a great place to start.
Q: Can I use different meat fillings?
A: Yes! Shredded chicken that has been cooked down in a tomato sauce, or even a simple tuna salad mix (with no mayo) is common.
✨ Summary
Empanadas are the ultimate crowd-pleasing, flavor-packed appetizer. Mastering the simple art of the seal means you can whip up large batches of these crispy, savory pockets for any impromptu gathering!
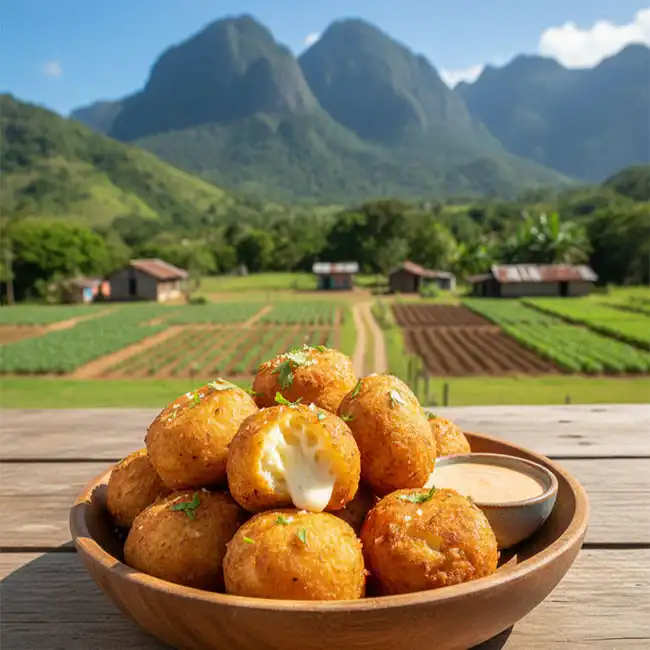
🍠 Recipe 3: Bolitas de Yuca (Cheesy Yuca Fritters) – Cheesy Yuca Fritters
For an appetizer that truly highlights an iconic Caribbean ingredient, we turn to Bolitas de Yuca (Cheesy Yuca Fritters). Yuca (also known as cassava) is a staple root vegetable, and when mashed and fried, it transforms into a savory, subtly earthy dough. These fritters are all about texture: a golden, crunchy exterior, a dense, chewy interior, and a burst of gooey, melted cheese at the core.
⚪ About this Recipe: Earthy Flavor, Irresistible Texture
Bolitas de Yuca is a naturally gluten-free snack that is incredibly popular throughout the Dominican Republic. The yuca itself has a much earthier, slightly sweeter flavor than a potato. The secret to a perfect bolita lies in two steps: first, mashing the yuca while it's still hot to create a smooth, sticky, pliable dough, and second, making sure the cheese filling is completely encased so it doesn't escape into the hot oil. They are best served straight from the fryer while the cheese is still wonderfully molten!
📝 Ingredients & Measurements
This recipe focuses on the proper preparation of the yuca dough to ensure a perfect fry. This yields about 12–15 medium-sized fritters.
For the Yuca Dough:
• 2.5 Pounds of Yuca Root (Look for the brown, waxy root; you can also use frozen pre-peeled chunks).
• 2 Teaspoons of Salt (1 tsp for cooking, 1 tsp for dough seasoning).
• 1 large Egg Yolk (This is your main binder, essential for a non-cracking dough).
• 1/2 teaspoon of Garlic Powder (Adds a savory kick to the dough).
• 1/4 teaspoon of Black Pepper.
For the Filling and Frying:
• 8 ounces of White Cheese (Mozzarella, Queso Blanco, or Monterey Jack), cut into 1/2-inch cubes.
• Vegetable Oil (for frying).
👩🍳 Step-by-Step Instructions
The preparation of the Yuca dough requires a specific technique to ensure smoothness and prevent cracking.
1.Prepare and Cook the Yuca: Peel the yuca root, cut it into 2-inch chunks, and rinse well. Place the chunks in a large pot and cover with cold water. Add 1 teaspoon of salt. Bring to a boil, then reduce heat and simmer for about 25–35 minutes until the yuca is very tender and the edges look slightly translucent.
2.Drain and Remove the Fiber: Drain the yuca completely. While the yuca is still steaming hot, you must remove the thick, hard, woody fibrous strand (the central vein) from the center of each piece. Discard this fiber.
3.Mash the Dough: While the yuca is still hot, use a potato masher or a strong fork to mash the yuca until it forms a smooth, sticky dough. There should be no lumps.
4.Season and Bind: Mix the mashed yuca with the remaining 1 teaspoon of salt, garlic powder, black pepper, and the egg yolk. Mix thoroughly until the dough is uniform and easy to handle.
5.Form the Bolitas: Scoop about 2 tablespoons of the yuca dough and flatten it in the palm of your hand. Place one cube of cheese in the center. Carefully wrap the yuca dough around the cheese, ensuring it is completely sealed, and roll it into a smooth ball. Tip: If the dough is too sticky, slightly oil your hands!
6.Fry until Golden: Heat the oil in a pot to 350∘F or 175∘C. Carefully place 4-5 bolitas at a time into the hot oil. Fry for about 3–5 minutes, turning frequently, until they are a deep, uniform golden brown.
7.Serve Warm: Remove the bolitas with a slotted spoon and drain on paper towels. Serve immediately while the cheese is hot and gooey and the exterior is crisp!
💡 Tips & Mistakes to Avoid
• Tip for the Dough: If your dough feels too dry and crumbly, add a tablespoon of warm water or milk to help bind it. If it’s too sticky, dust your hands with a tiny bit of flour or oil them up.
• Mistake to Avoid: Cracked Shells: If the surface of the bolitas has cracks, the cheese will leak out when heated. Take the time to roll them until perfectly smooth and sealed.
• Yuca Sourcing: Frozen, pre-peeled yuca can save you a lot of effort and is just as good as fresh for this application.
• Perfect Serving: Serve with a cilantro-lime dipping sauce or a slightly spicy tomato salsa.
❓ FAQ
Q: Why is my yuca dough stringy?
A: This is almost always because the woody, fibrous central strand was not completely removed from the yuca pieces before mashing. You need to pull out that tough core!
Q: Can I make these in an air fryer?
A: Yes! Brush or spray the formed bolitas generously with oil. Air fry at 400°F / 200°C for 10–12 minutes, turning halfway, until golden brown.
Q: Can I stuff them with something else?
A: Yes, small cubes of seasoned pork, ham, or even a pre-cooked shredded chicken mixture are great savory alternatives to the cheese.
✨ Summary
Bolitas de Yuca are a textural delight and a wonderful showcase for the versatility of the yuca root. They offer a comforting, slightly earthy flavor combined with that satisfying crunch and a rich, melted center.
🎉 Final Thoughts: Your Picadera is Ready!
Wow, you made it through! You are now fully equipped with the knowledge and techniques to create an absolutely unforgettable Dominican picadera spread for your friends and family. We’ve covered everything you need to master:
• The hearty, comfort-food delight of Yaroa, with its rich meat and cheesy layers.
• The essential party favorite, Empanadas, in their crispy, savory glory.
• The unique, satisfying crunch and chewy texture of Bolitas de Yuca.
The best thing about these recipes is that while they taste exotic and complex, they rely on simple cooking fundamentals: good seasoning, precise temperature control, and the art of proper sealing. You don't need to be a professional chef to achieve authentic, incredible results!
I encourage you to start with the item that excites you most! Perhaps try the Empanadas first using store-bought dough for a quick win, or dive straight into the comforting layers of the Yaroa. Whichever you choose, don't be afraid to tweak the seasoning to your personal preference.
The world of Dominican cuisine is vibrant and welcoming. Give one of these recipes a try, share it with your loved ones, and soak up the joy of the picadera tradition!
Which of these three fantastic Dominican snacks will be the star of your kitchen tonight? Let me know, and I can give you a personalized recommendation for the perfect dipping sauce!
| 🇩🇴 🍱 < Back |