
🏠 Home > 🗺️ Recipes > 🍞 Breads > 🇫🇯 Fiji Breads > 🍞 1.Fijian Coconut Buns (Pani Popo style) , 2.Traditional Lolo Bread (Steamed Coconut Loaf) , 3.Fijian Soft Roti (The Essential Flatbread)
🍞 The Baker’s Island Guide: Mastering the Signature Breads of Fiji
Published by Supakorn | Updated: February 2026
🥖 Discover the Warm, Fluffy Secrets of the South Pacific
Hey friend! If there is one thing that truly connects every household across the 333 islands of Fiji, it’s the smell of fresh bread wafting from a kitchen in the early morning. Baking in Fiji isn’t just about making food; it’s a ritual. Whether it’s a family gathering, a village church meeting, or just a quiet afternoon tea, bread is the glue that holds Fijian hospitality together.
Fijian breads are unique because they perfectly blend indigenous island ingredients—like rich coconut milk and fresh bananas—with global influences brought by the Indian and European communities. These recipes are starting to trend globally because they offer a tropical twist on classic comfort food that you just can't find in a standard bakery.
In this guide, I’m going to walk you through three "must-try" recipes that define the Fijian bakery experience. We are going to dive deep into:
🥇 • Recipe 1; Fijian Coconut Buns (Pani Popo style) – The Ultimate Sweet Treat, Sweet, fluffy buns bathed in creamy coconut syrup.
🥈 • Recipe 2; Traditional Lolo Bread (Steamed Coconut Loaf) – A traditional, dense, and slightly sweet steamed loaf.
🥉 • Recipe 3; Fijian Soft Roti (The Essential Flatbread) – The essential unleavened flatbread that accompanies every spicy meal.
Grab your mixing bowl and let's bring that island bakery scent to your home!

🥥 Recipe 1: Fijian Coconut Buns (Pani Popo style)
🥯 About this Recipe
If you’ve ever wanted to eat a cloud that tastes like a tropical vacation, this is it. Fijian Coconut Buns are soft, yeasted rolls that are baked in a pool of sweetened coconut milk. As they bake, the bottom of the buns absorbs the coconut cream, becoming sticky and custard-like, while the tops stay golden and fluffy. They are a favorite for "afternoon tea" and are guaranteed to disappear within minutes of leaving the oven.
🧂 Ingredients & Measurements
For the Dough:
• 4 cups of All-purpose Flour
• 1/4 cup of White Sugar
• 1 packet (7 grams) of Active Dry Yeast
• 1 cup of Warm Milk (not boiling!)
• 1/4 cup of Unsalted Butter, melted
• 1 large Egg, room temperature
• 1/2 teaspoon of Salt
For the Coconut Sauce:
• 1.5 cups of Thick Coconut Cream
• 1/2 cup of White Sugar (adjust if you prefer it less sweet)
• 1/2 teaspoon of Vanilla Extract
👨🍳 Step-by-Step Instructions
1.Activate the Yeast: In a small bowl, combine the warm milk, one tablespoon of the sugar, and the yeast. Let it sit for about 5–10 minutes until it becomes frothy.
2.Mix the Dough: In a large bowl, whisk together the flour, the remaining sugar, and salt. Make a well in the center and pour in the yeast mixture, melted butter, and the beaten egg.
3.Knead with Love: Mix until a dough forms, then move it to a floured surface. Knead for about 8–10 minutes until the dough is smooth and elastic.
4.First Rise: Place the dough in a greased bowl, cover with a damp cloth, and let it rise in a warm spot for 1 hour or until doubled in size.
5.Shape the Buns: Punch the dough down to release air. Divide it into 12 equal pieces and roll them into smooth balls.
6.The Coconut Bath: Grease a 9x13 inch baking pan. In a separate bowl, whisk the coconut cream, sugar, and vanilla together. Pour half of this mixture into the bottom of the baking pan.
7.Second Rise: Place the dough balls into the pan on top of the sauce. Cover and let them rise for another 30–45 minutes.
8.Bake: Preheat your oven to 365 degrees Fahrenheit / 180 degrees Celsius. Pour the remaining coconut sauce over the tops of the buns. Bake for 20–25 minutes until the tops are golden brown.
9.Rest and Serve: Let them sit for 10 minutes to soak up more of that delicious syrup before serving.
💡 Tips & Mistakes to Avoid
• Warmth is Key: Ensure your milk is warm (about 104∘F or 40C ), not hot. If it's too hot, it will kill the yeast and your buns will be like rocks.
• Crowding the Pan: Leave a little space between the buns during the second rise; they will expand and touch each other, which is exactly what you want for pull-apart buns.
• Full Fat Only: Use full-fat coconut cream (not milk). The fat is what creates the "custard" texture at the bottom.
• Check the Bottom: If the tops are browning too fast but the coconut sauce is still very watery, cover the pan with foil for the last 5 minutes.
❓ FAQ
Q1.Can I make these vegan?
Yes! Use plant-based milk (like almond or more coconut milk) and swap the butter for coconut oil and the egg for a "flax egg."
Q2.How long do they last?
These are best eaten fresh on the day. However, you can store them in an airtight container for 2 days and reheat them in the microwave for 20 seconds to bring back the softness.
📝 Summary
These Coconut Buns are the soul of Fijian comfort. They are the perfect balance of a light pastry and a rich, creamy dessert.
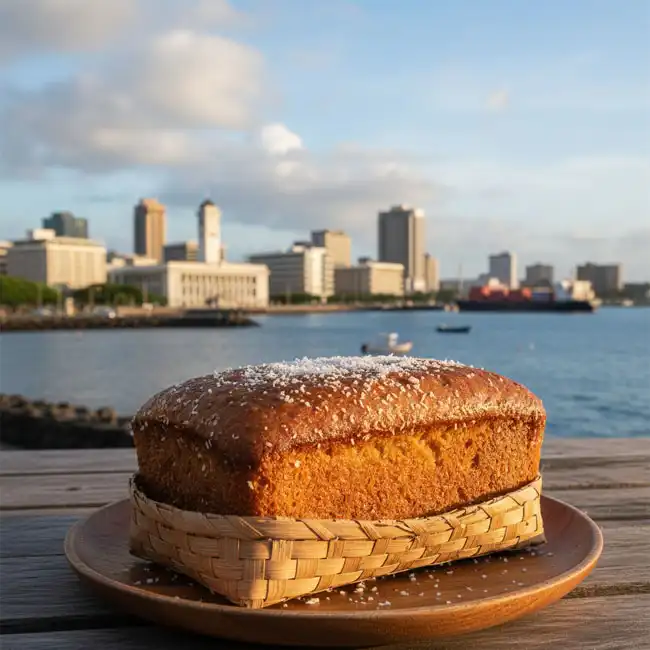
🍞 Recipe 2: Traditional Lolo Bread (Steamed Coconut Loaf)
🥯 About this Recipe
Lolo Bread is a fascinating tradition in Fiji. Historically, many island kitchens didn't have ovens, so "baking" was often done by steaming. Lolo Bread is a dense, cake-like bread that is cooked in a tin inside a pot of boiling water. It has a unique, moist crumb and a subtle coconut fragrance that makes it perfect for spreading with thick jam or butter.
🧂 Ingredients & Measurements
• 3 cups of All-purpose Flour
• 1 tablespoon of Baking Powder
• 1/2 cup of White Sugar
• 1.5 cups of Thick Coconut Milk
• 1 teaspoon of Vanilla Extract
• 1/4 teaspoon of Salt
• 2 tablespoons of Desiccated Coconut (optional, for texture)
👨🍳 Step-by-Step Instructions
1.Prep the Steamer: Find a large pot with a tight-fitting lid. Place a small wire rack or an upside-down saucer at the bottom. Fill the pot with about 2 inches of water and bring it to a simmer.
2.Dry Mix: In a large bowl, sift together the flour, baking powder, sugar, and salt. Stir in the desiccated coconut if you're using it.
3.Wet Mix: Make a well in the center and pour in the coconut milk and vanilla extract.
4.Fold Gently: Mix the ingredients together with a large spoon. Don't overwork it—just stir until the flour is hydrated. The batter should be thick and heavy.
5.Prepare the Tin: Grease a loaf tin (or a clean coffee tin, which is the traditional way!) very well. Pour the batter in and smooth the top.
6.The Seal: Cover the tin tightly with aluminum foil. Use a rubber band or string to ensure no steam can get inside the tin.
7.Steam: Place the tin on the rack inside the pot. Cover the pot with its lid. Steam over medium heat for 1 hour to 1 hour and 15 minutes.
8.The Skewer Test: Carefully remove the tin, unwrap the foil, and insert a skewer. If it comes out clean, it’s done!
9.Cooling: Let it cool in the tin for 10 minutes before slicing.
💡 Tips & Mistakes to Avoid
• Water Level: Check the water level every 20 minutes. If it dries out, your pot will burn! Always top it up with boiling water, not cold water.
• Don't Peek: Try not to open the pot lid for the first 45 minutes. You need to keep the steam pressure constant for the bread to rise.
• The Tin Size: If your tin is very wide, the bread will be shorter and cook faster. A tall, narrow tin produces the most traditional shape.
• Gentle Mixing: Over-mixing the batter will make the bread tough. Stop as soon as you see no more dry flour.
❓ FAQ
Q1.Why is my bread soggy?
This usually happens if steam leaked into the tin. Make sure your foil seal is incredibly tight next time.
Q2.Can I bake this in an oven?
You can bake it at 338°F or 170°C for 45–50 minutes, but it will lose that signature "steamed" density and moistness that makes it Lolo Bread.
📝 Summary
Lolo Bread is a rustic, humble loaf that perfectly represents island resourcefulness. It's the ultimate companion for a hot cup of lemon grass tea.
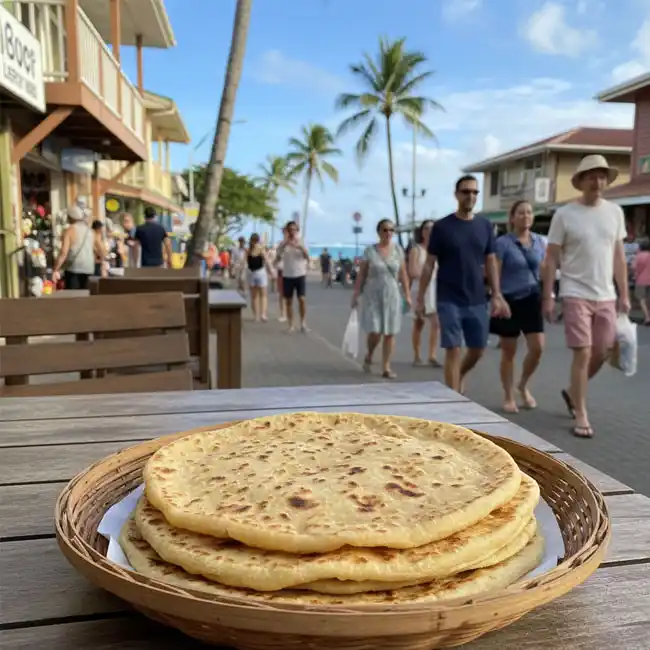
🍪 Recipe 3: Fijian Soft Roti (The Essential Flatbread)
🥯 About this Recipe
You cannot have a meal in Fiji without Roti. While inspired by the Indian paratha, the Fijian Roti has evolved to be incredibly soft, thin, and slightly buttery. It is used as a "utensil" to scoop up curries, stews, and chutneys. Mastering the Roti is a rite of passage for many Fijian cooks, and once you taste a homemade one, you'll never go back to store-bought wraps.
🧂 Ingredients & Measurements
• 3 cups of All-purpose Flour
• 1 cup of Boiling Water (essential for softness)
• 3 tablespoons of Vegetable Oil or Ghee (plus extra for brushing)
• 1/2 teaspoon of Salt
👨🍳 Step-by-Step Instructions
1.Hot Mix: Place the flour and salt in a large heat-proof bowl. Add 2 tablespoons of oil. Pour in the boiling water gradually while stirring with a wooden spoon.
2.The Rest: Once it’s cool enough to touch, knead the dough in the bowl for about 5 minutes. It should be soft and slightly tacky. Cover and let it rest for at least 30 minutes. (This "relaxes" the gluten, making it easier to roll).
3.Divide: Divide the dough into small, golf-ball-sized portions (about 12–15 balls).
4.The Roll: On a floured surface, flatten a ball with your palm. Roll it out into a thin circle using a rolling pin.
5.The Secret Layer: Brush a tiny bit of oil on the circle, fold it in half, then fold it again into a triangle. Roll it out once more into a thin circle. This creates tiny layers that make the Roti soft.
6.Heat the Tawa: Heat a flat griddle or "Tawa" over medium-high heat.
7.Cook: Place the Roti on the hot pan. When small bubbles appear, flip it.
8.Brush and Puff: Brush the top with a little oil or ghee. Flip again and press the edges gently with a clean cloth or spatula—this helps it puff up.
9.Keep Warm: Stack the cooked rotis in a clean kitchen towel inside a container. The steam between the rotis keeps them soft.
💡 Tips & Mistakes to Avoid
• Boiling Water: This is the "secret." Boiling water partially "cooks" the flour, resulting in a much softer texture than cold water.
• Resting the Dough: If you try to roll it immediately, the dough will snap back like a rubber band. Give it that 30-minute nap!
• High Heat: Don't cook Roti on low heat; it will dry out and become a cracker. You want it to cook fast (about 30-45 seconds per side).
• Stacking: Never leave rotis out on a plate individually. Always stack them and cover them immediately to lock in moisture.
❓ FAQ
Q1.Why is my Roti hard and crispy?
Either your pan wasn't hot enough, or you didn't cover the cooked rotis in a towel immediately. Speed and steam are your best friends here.
Q2.Can I freeze Roti?
Yes! Once cooled, stack them with parchment paper in between and freeze in a zip-lock bag. Reheat in a dry pan for 10 seconds.
📝 Summary
Fijian Roti is the backbone of island dining. Simple, versatile, and incredibly satisfying, it’s the perfect skill to add to your baking repertoire.
✨ Final Thoughts
And there you have it—the "Big Three" of Fijian baking! From the decadent, syrup-soaked Coconut Buns to the unique Steamed Lolo Bread and the everyday essential Soft Roti, these recipes offer a signature taste that you just can’t replicate with standard Western bread.
The beauty of these recipes is that they don't require fancy stand mixers or expensive artisanal flour. They are born from island homes where the focus is on texture, warmth, and flavor.
I really encourage you to try them one by one. Start with the Roti—it’s the most versatile. Then, when you have a free Sunday afternoon, treat yourself to those Coconut Buns. I promise your neighbors will be knocking on your door asking what that amazing smell is!
Which one of these are you going to bake first? If you run into any trouble with your dough or your steaming setup, just drop a comment below and I'll help you out! Happy baking!
| 🇫🇯 🍞 < Back |