
🏠 Home > 🗺️ Recipes > 🍨 Desserts > 🇬🇾 Guyana Desserts > 🍨 1.Healthy Salara (The Low-Carb Coconut Fluff) , 2.Low-Sugar Cassava Pone (The Wholesome Baked Good) , 3.Low-Sugar Tamarind Balls (The Zesty, Chewy Candy)
🍨 Light & Luscious: Low-Calorie Guyana Desserts That Fit Your Weight Loss Goals
Published by Supakorn | Updated: February 2026
🌟 Embracing the Sweet Life, Guilt-Free: An Introduction
Hey there, dessert lovers and fitness friends! How often have you scrolled through mouth-watering Caribbean recipes only to sigh and close the tab, convinced that "soul food" and "weight loss" just don't mix? I get it. Traditional Guyanese sweets are rich, deeply comforting, and often packed with butter, sugar, and flour—ingredients that, while delicious, aren't exactly diet-friendly in their original form.
But what if I told you that you don’t have to give up those vibrant, warming flavors of the Land of Many Waters? What if you could enjoy a slice of fragrant Salara, a bite of wholesome Cassava Pone, or a tangy Tamarind Ball, all while staying perfectly on track with your fitness and health goals?
Guyanese cuisine is built on fresh, powerful, and nutritious ingredients like coconut, cassava, and tropical fruits. By making smart swaps and controlling portion sizes, we can unlock the delicious potential of these classic recipes and significantly drop the calorie and refined sugar counts.
These aren't bland compromises; they are flavor-forward adaptations designed for today's health-conscious food adventurer. They maintain the authentic taste and comforting spirit of Guyanese baking, ensuring you can celebrate your heritage (or simply explore a new cuisine) without the guilt!
This article is your passport to guilt-free Guyanese goodness! We’ve taken three of the most popular Guyanese sweet treats and expertly adjusted them to be Low-Calorie and Weight Loss-Friendly. Get ready to bake, snack, and stay healthy!
We will be diving into:
🌟 Recipe 1: Healthy Salara (The Low-Carb Coconut Fluff): A lighter take on the classic pink-filled bread.
🌟 Recipe 2: Low-Sugar Cassava Pone (The Wholesome Baked Good): Reducing the sugar and oil for a dense, nutritious treat.
🌟 Recipe 3: Low-Sugar Tamarind Balls (The Zesty, Chewy Candy): Controlling the added sugar for a naturally tangy snack.
Let's get cooking!
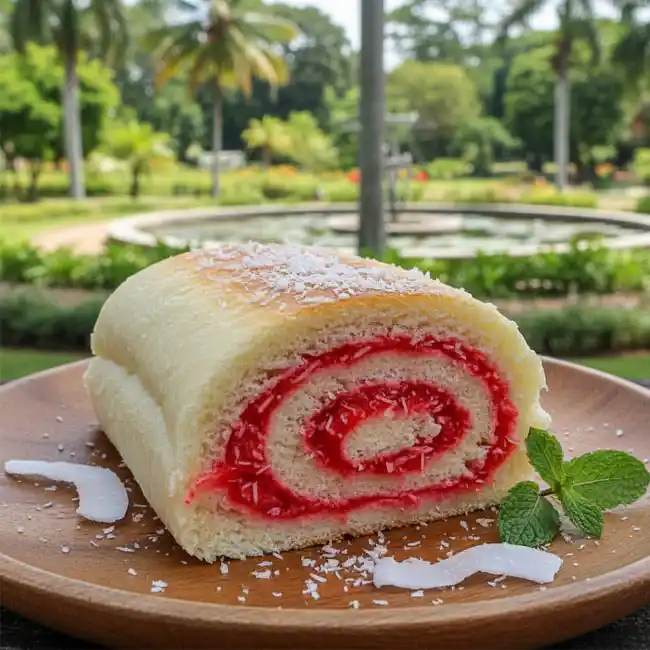
🥥 Recipe 1: Healthy Salara (The Low-Carb Coconut Fluff)
✨ About this Recipe: The Lighter Pink Roll
Salara is a quintessential Guyanese sweet bread—soft, fluffy, and filled with a beautiful, brightly colored shredded coconut mixture. The traditional version, however, is essentially a sweet white bread loaf, heavy on flour and sugar. Our version focuses on keeping the delightful coconut filling texture and flavor, but significantly reduces the refined carbohydrates by replacing most of the white flour with a low-carb alternative and using a natural, zero-calorie sweetener. It’s all the flavor, less of the guilt!
🌿 Ingredients & Measurements
For the Dough (Low-Carb):
• Almond Flour: 1 cup (120g)
• Psyllium Husk Powder: 1/4 cup (30g)—Crucial for structure!
• Baking Powder: 1 teaspoon
• Zero-Calorie Sweetener (Granulated Erythritol/Stevia Blend): 1/4 cup
• Salt: 1/2 teaspoon
• Warm Water: 1 cup
• Egg Whites: 2 large
For the Low-Sugar Filling:
• Shredded Unsweetened Coconut: 1 cup (80g)
• Zero-Calorie Powdered Sweetener: 1/2 cup (or to taste)
• Vanilla Extract: 1 teaspoon
• Nutmeg/Cinnamon: 1/4 teaspoon each
• Pink Food Coloring (Optional): A few drops
📝 Step-by-Step Instructions
1.Prep the Filling: In a bowl, combine the shredded coconut, powdered sweetener, vanilla, nutmeg, and cinnamon. Add a few drops of pink food coloring if desired. Set aside.
2.Mix Dry Dough Ingredients: In a large bowl, whisk together the almond flour, psyllium husk powder, baking powder, granulated sweetener, and salt until evenly combined.
3.Add Wet Ingredients: Add the warm water and egg whites to the dry mixture. Use a hand mixer or stand mixer to combine thoroughly. The psyllium husk will absorb the liquid quickly, creating a sticky, dough-like ball.
4.Knead and Rest: Lightly grease your hands and form the dough into a smooth ball. Let it rest for 10 minutes to allow the psyllium to fully hydrate.
5.Assemble the Salara: Place the dough between two sheets of parchment paper. Roll the dough out into a rectangle about 1/4 inch thick.
6.Spread and Roll: Spread the prepared coconut filling evenly over the dough rectangle, leaving a small border along one long edge. Carefully roll the dough tightly from the opposite long edge toward the border, creating a log.
7.Bake: Place the rolled Salara log on a baking sheet lined with parchment paper. Bake in a preheated oven at 350∘F or 175∘C for 25 to 30 minutes, or until the top is lightly golden brown and the loaf feels firm.
8.Cool and Slice: Allow the Salara to cool completely on a wire rack before slicing. This prevents crumbling, as the low-carb dough is delicate when hot.
⚠️ Tips & Mistakes to Avoid
• Tip for Dough Texture: The dough needs to be sticky. If it feels too dry, add a splash more warm water, but be cautious—too much water makes it hard to roll.
•Mistake: Skipping the Psyllium: Do not substitute or omit the psyllium husk powder. It provides the elasticity and structure that traditional wheat flour provides, making the rolling and slicing possible in a low-carb bake.
•Tip for Color: If you want that classic pink filling, use natural coloring from beet juice powder or a tiny bit of red food coloring. The color doesn't impact the calorie count, but it adds to the authenticity!
• Tip for Slicing: Ensure the loaf is fully cooled. Use a very sharp, slightly serrated knife for clean, beautiful slices.
❓ FAQ
Q1: Can I use regular all-purpose flour instead of almond flour?
A: Yes, but this will significantly increase the carbohydrate and calorie count, defeating the purpose of the low-carb version. Stick to almond or coconut flour for a keto/low-carb result.
Q2: Why does the recipe use egg whites and not whole eggs?
A: We use only egg whites to reduce the fat and calorie content from the yolk, aiming for a lighter texture and a cleaner flavor profile that allows the coconut to shine.
Q3: How do I store leftover Salara?
A: Store sliced Salara in an airtight container at room temperature for up to 3 days, or refrigerate for up to a week. You can gently warm slices before eating if you prefer a softer texture.
📝 Summary
This low-carb Salara delivers the essential sweet coconut flavor and fluffy bread texture with a fraction of the traditional refined sugar and carbs. It's the perfect guilt-free treat to satisfy your Caribbean bakery craving!
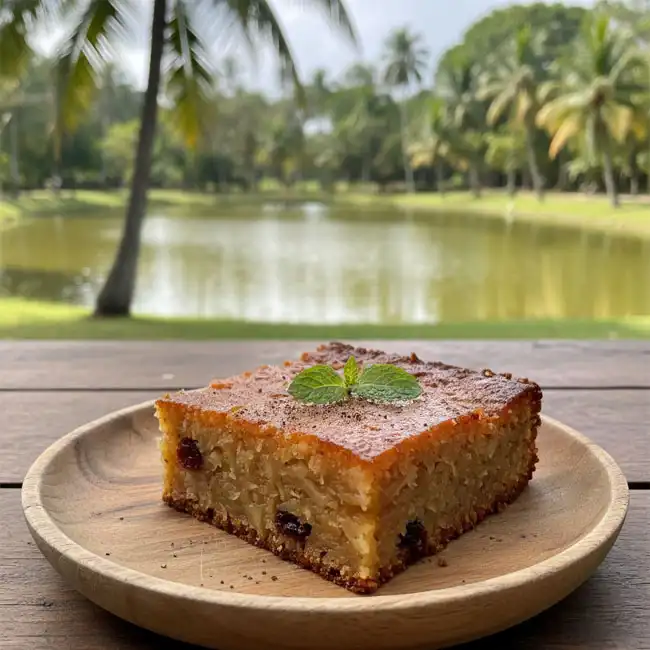
🍠 Recipe 2: Low-Sugar Cassava Pone (The Wholesome Baked Good)
✨ About this Recipe: Nutrient-Dense Comfort
Cassava Pone is a dense, rustic, and incredibly satisfying Guyanese dessert often made with large amounts of white sugar, butter, and sometimes condensed milk. Our low-calorie version maintains the pone’s characteristic chewiness and rich flavor by maximizing the natural fiber and flavor of the cassava and coconut, while replacing most of the high-calorie fats and refined sugar with healthier alternatives. This adaptation makes it a nutrient-dense, high-fiber treat.
🌿 Ingredients & Measurements
• Grated Cassava (Frozen or Fresh, thawed): 3 cups
• Shredded Unsweetened Coconut: 1 cup
• Coconut Milk (Light/Reduced-Fat): 1/2 cup
• Unsweetened Applesauce (or melted coconut oil): 1/4 cup—For binding and moisture, reducing total fat.
• Zero-Calorie Granulated Sweetener (or Coconut Sugar): 1/2 cup (or to taste)
• Ground Cinnamon: 1 teaspoon
• Freshly Grated Nutmeg: 1/2 teaspoon
• Vanilla Essence: 1 teaspoon
• Salt: 1/2 teaspoon
📝 Step-by-Step Instructions
1.Prep Cassava: If using frozen grated cassava, ensure it is fully thawed and squeeze out any excess moisture using a clean cloth or cheesecloth. This step is crucial for the final texture.
2.Mix Dry Ingredients: In a very large bowl, combine the grated cassava, shredded coconut, sweetener, cinnamon, nutmeg, and salt. Mix thoroughly to ensure the spices are evenly distributed.
3.Add Wet Ingredients: In a separate small bowl, whisk together the light coconut milk, applesauce (or oil), and vanilla essence.
4.Combine: Pour the wet mixture over the dry ingredients. Mix everything thoroughly with a sturdy wooden spoon until a uniform, thick batter forms.
5.Bake: Pour the batter into an 8 x 8-inch baking dish lightly greased or lined with parchment paper. Smooth the top with a spoon.
6.Oven Time: Bake in a preheated oven at 375°F ( 190°C) for 45 to 55 minutes, or until the top is golden brown and a toothpick inserted into the center comes out relatively clean (it will remain dense, so don't expect a dry crumb).
7.Cool and Serve: Let the pone cool in the pan for at least 30 minutes before slicing. Cassava pone firms up beautifully as it cools.
⚠️ Tips & Mistakes to Avoid
• Tip for Flavor: Use freshly grated nutmeg instead of pre-ground for the best, most aromatic result. The flavor impact is huge and worth the minimal effort.
• Mistake: Not Squeezing the Cassava: If you skip squeezing out the moisture from the grated cassava (especially frozen), your pone will be soggy and fail to set correctly.
• Tip for Texture: If you prefer a slightly softer pone, add 1/4 cup of raisins (account for the extra calories) or 1 extra tablespoon of light coconut milk.
• Mistake: Overbaking: Because of the lower fat and sugar content, this version can dry out more easily. Remove it from the oven as soon as the top is golden and the center is set.
❓ FAQ
Q1: Is cassava healthy for weight loss?
A: Cassava is high in carbohydrates, but it is also very high in resistant starch when cooked and cooled. Resistant starch acts like fiber in the body, which can support healthy gut bacteria and promote satiety, making portion-controlled amounts suitable for a weight loss diet.
Q2: Can I use pre-ground cassava flour?
A: It is highly recommended to use grated fresh or frozen cassava for this recipe, as the texture and moisture of the grated root are essential to the Pone's characteristic density and chewiness. Flour will yield a cake-like, non-traditional result.
Q3: How should I store leftover Cassava Pone?
A: Store in an airtight container at room temperature for up to 2 days, or refrigerate for up to 5 days. It actually tastes great when chilled!
📝 Summary
By swapping butter for unsweetened applesauce and refined sugar for a low-calorie alternative, this Cassava Pone provides a dense, comforting, high-fiber treat that respects the original flavor profile without compromising your low-calorie commitment.

🥭 Recipe 3: Low-Sugar Tamarind Balls (The Zesty, Chewy Candy)
✨ About this Recipe: Naturally Tangy and Sweet
Tamarind Balls are a classic Caribbean street candy. They are intensely tangy and traditionally coated in an enormous amount of granulated sugar, both inside and out. Our low-sugar version focuses on the natural sweet-and-sour flavor of the tamarind pulp while using just enough sweetener to balance the tartness, dramatically reducing the calorie count of this addictive snack.
🌿 Ingredients & Measurements
• Fresh Tamarind Pulp (seeds removed): 1 cup (about 250g)
• Zero-Calorie Powdered Sweetener (Erythritol/Monk Fruit): 1/4 cup (or to taste)—Start small, taste often!
• Water: 1 tablespoon (only if the pulp is too stiff)
• Pinch of Salt: 1/4 teaspoon
• Cayenne Pepper or Guyanese Wiri Wiri Pepper Powder (Optional): 1/4 teaspoon (for the traditional spicy kick)
• Extra Powdered Sweetener: 2 tablespoons (for rolling/coating)
📝 Step-by-Step Instructions
1.Prep the Pulp: Ensure the tamarind pulp is soft and pliable. If it’s very stiff, knead it with 1 tablespoon of warm water until it reaches a thick, moldable consistency. Remove any lingering seeds or hard fibers.
2.Combine Flavoring: In a bowl, mix the tamarind pulp with the 1/4 cup of powdered sweetener, salt, and the optional cayenne/pepper powder.
3.Taste and Adjust: Crucially, taste the mixture. Tamarind tartness varies wildly. Add more sweetener if the mixture is too sour for your liking, but remember the goal is low-calorie!
4.Form the Balls: Scoop the mixture using a small spoon (about 1 tablespoon per ball). Roll the mixture between your palms to create small, uniform balls.
5.Coat (Optional but Recommended): Place the extra 2 tablespoons of powdered sweetener in a shallow dish. Roll each finished ball in the sweetener to give it a nice, non-sticky coating and a final visual presentation.
6.Set: Place the tamarind balls on parchment paper and let them sit at room temperature for an hour to slightly dry and set before storing.
⚠️ Tips & Mistakes to Avoid
• Tip for Easy Rolling: Use lightly damp hands or oil your palms with a tiny bit of coconut oil (<1/4 teaspoon total) to prevent the sticky pulp from adhering to your skin.
• Mistake: Using Granulated Sweetener for Coating: Use powdered zero-calorie sweetener for coating. Granulated sweetener will feel gritty and won't adhere properly to the sticky pulp.
• Tip for Spice: Don't skip the pinch of cayenne or traditional Guyanese pepper if you enjoy a complex flavor profile! The small amount adds a fantastic contrasting heat without adding significant calories.
• Mistake: Too Much Sweetener: Tamarind's beauty is its tartness. Adding too much sweetener will make it taste artificial or overly sugary, losing its characteristic zesty appeal.
❓ FAQ
Q1: Where can I find tamarind pulp?
A: You can usually find tamarind pulp (often sold in compressed blocks) in the international or Asian/Indian section of large supermarkets, or in specialty Caribbean/Latin American grocery stores.
Q2: Are tamarind balls a suitable daily snack?
A: Since tamarind is fruit-based and our version uses zero-calorie sweetener, they are a much healthier alternative to traditional candy. However, they are still naturally high in fruit sugars and fiber, so enjoy them in moderation—one or two balls per serving is ideal.
Q3: Can I freeze these tamarind balls?
A: Yes, you can freeze them for long-term storage in a freezer-safe bag for up to 3 months. Thaw them at room temperature for about 30 minutes before eating.
📝 Summary
This low-sugar Tamarind Ball recipe maximizes the fruit's natural sweet-and-sour punch while replacing the huge sugar coating with a low-calorie alternative. It’s the perfect, zesty, chewy, portion-controlled candy for when you need a powerful burst of tropical flavor.
💚 Final Thoughts: Your Guilt-Free Caribbean Kitchen
See? Eating delicious, culturally rich food doesn't mean sacrificing your health goals!
We’ve successfully transformed three Guyanese dessert classics—the fluffy Salara, the hearty Cassava Pone, and the tangy Tamarind Balls—into low-calorie, weight loss-friendly treats. These adaptations prove that with simple ingredient swaps (like zero-calorie sweeteners, lighter fats, and high-fiber flours), you can keep the integrity and soul of traditional cooking alive.
The key to weight loss success, especially with comforting food, is moderation and smart substitutions. Start with the recipe that intrigues you most—perhaps that unique pink Salara roll—and build your confidence.
Now go ahead, give these recipes a try! I’d love to hear which one became your new favorite guilt-free Caribbean comfort food. Happy baking and happy healthy eating!
| 🇬🇾 🍨 < Back |