
🏠 Home > 🗺️ Recipes > 🍨 Desserts > 🇵🇦 Panama Desserts > 🍨 1.Tres Leches Cake (Pastel de Tres Leches) , 2.Arroz con Leche , 3.Cocadas
🍨 Homemade Happiness: Iconic Panamanian Dessert Recipes for Your Next Gathering
Published by Supakorn | Updated: February 2026
🌴 👨👩👧👦 Sweet Beginnings: Why Panamanian Desserts Are the Best to Share
Hey there, fellow home baker and food lover! Have you ever noticed how the most unforgettable moments are often shared over something sweet? Panama, a country known for its vibrant culture and tropical warmth, has mastered the art of the communal dessert. These are treats that are rich in history, comforting in flavor, and designed specifically to be divided among a joyful crowd.
While Panamanian cuisine is famous for its savory sancocho and fresh ceviche, the country’s dessert game is seriously underrated on the global stage. These sweets are the culmination of Spanish, African, and indigenous influences, all blended with the bounty of tropical fruits, rice, and, crucially, a lot of creamy milk and sugar. They are hearty, homey, and the perfect balance of familiar comfort and exotic tropical zest.
In recent years, as travelers discover the warmth of Central American kitchens, the popularity of these desserts has soared. Tres Leches Cake, for example, has become a global phenomenon, and rightfully so! But there's so much more sweetness to explore.
That’s why we’ve rounded up the three most popular and beloved Panamanian dessert recipes that are guaranteed to be a hit at your next family dinner, potluck, or simple weekend gathering. We’re going to walk through the essential steps to master:
🌈 • 1.Tres Leches Cake (Pastel de Tres Leches): The moist, milky, celebratory favorite.
🌈 • 2.Arroz con Leche: The creamy, comforting, spiced rice pudding.
🌈 • 3.Cocadas: The chewy, simple, tropical coconut candy.
Ready to bake, simmer, and share some sweet Panamanian joy? Let's get started!👨👩👧👦

🎂 Recipe 1: Tres Leches Cake (Pastel de Tres Leches) – The Ultimate Celebration Cake
🍍 About this Recipe: The Moist, Milky Masterpiece
The Pastel de Tres Leches (Three Milks Cake) is the undisputed king of Panamanian celebrations. It’s an iconic Latin American dessert, and Panama makes one of the very best versions. This cake is not about frosting; it’s about texture and moisture. A light, airy sponge cake is soaked in a signature mixture of three different types of milk—evaporated, condensed, and heavy cream—until it is incredibly moist, tender, and saturated with creamy sweetness. It’s then chilled and topped with a cloud of homemade meringue or whipped cream. It's truly a decadent experience!
📝 Ingredients & Measurements
For the Sponge Cake:
• 1 1/2 cups of All-Purpose Flour: This is your base, ensuring a light and fluffy cake.
• 1 teaspoon of Baking Powder: For that essential lift.
• 1/2 cup of Unsalted Butter: Softened to room temperature, around 1 stick.
• 1 cup of Granulated Sugar: To provide sweetness and structure.
• 4 Large Eggs: Separated into yolks and whites; the whites will be beaten separately for airiness.
• 1/2 cup of Whole Milk: Just a splash to keep the batter moist.
• 1 teaspoon of Vanilla Extract: Pure vanilla for flavor.
For the Three Milks Soaking Mixture:
• 1 (12-ounce) can of Evaporated Milk: Providing richness and body.
• 1 (14-ounce) can of Sweetened Condensed Milk: The main source of intense sweetness and creaminess.
• 1 cup of Heavy Cream (or Half-and-Half): To complete the trio and add luxurious mouthfeel.
For the Topping (Meringue or Whipped Cream):
• 1 1/2 cups of Heavy Whipping Cream: Chilled, for a simple and airy topping.
• 3 tablespoons of Powdered Sugar: To sweeten the whipped cream.
• 1/2 teaspoon of Vanilla Extract: For that extra flavor kick.
• Optional: A sprinkle of ground cinnamon or a few fresh berries for garnish.
👩🍳 Step-by-Step Instructions
1.Prep the Sponge: Preheat your oven to 350∘F / 175∘C. Grease and flour a 9 - 13-inch baking pan.
2.Cream Butter and Sugar: In a large bowl, beat the softened butter and 1 cup of granulated sugar until light and fluffy. Beat in the egg yolks one at a time. Mix in the 1/2 cup of whole milk and the vanilla extract.
3.Whip the Whites: In a separate, clean bowl, beat the egg whites until stiff, glossy peaks form. Gently fold the beaten egg whites into the main batter mixture—this is key for keeping the cake light!
4.Fold and Bake: Sift the flour and baking powder together, then gently fold this into the batter until just combined. Pour the batter into the prepared pan and bake for 25 to 30 minutes, or until a toothpick inserted into the center comes out clean. Let the cake cool completely in the pan.
5.Mix the Milks: While the cake cools, whisk together the evaporated milk, sweetened condensed milk, and 1 cup of heavy cream in a medium bowl.
6.The Soak: Once the cake is completely cool, use a fork or skewer to poke holes all over the surface. Slowly and evenly pour the milk mixture over the entire cake. Be patient; it will all soak in! Cover and refrigerate for at least 4 hours, or ideally overnight.
7.Whip the Topping: Just before serving, beat the 1 1/2 cups of heavy whipping cream with the powdered sugar and vanilla until soft peaks form. Spread this over the chilled, soaked cake.
8.Serve: Slice and enjoy!
🌟 Tips & Mistakes to Avoid
• Don't Overbake: An overbaked cake will be dry and won't soak up the milk as well, ruining the texture. Take it out the second the toothpick comes clean.
• Cool Completely: The cake must be completely cool before you pour the milk mixture. If it's warm, it will turn mushy instead of absorbing the milk evenly.
• Refrigeration is Mandatory: Don't skip the overnight chill! This time allows the flavors to deepen and the cake to fully stabilize into that perfect moist consistency.
• For Extra Flavor: You can add a splash of rum or a touch of lime zest to the milk mixture, though keep it optional depending on your preference!
❓ FAQ
Q: Can I use a different size pan?
A: Yes, but a smaller pan (like an 8 x 8-inch square) will result in a much taller, denser cake, and you may need to increase the soaking milk amount slightly and bake for longer. The 9 - 13-inch pan is best for the traditional thickness.
Q: How long does Tres Leches Cake keep?
A: Because it is saturated with dairy, it must be kept refrigerated. It is best eaten within 3 to 4 days.
Q: Can I use store-bought frosting?
A: Absolutely! While a fresh meringue or simple whipped cream is traditional, a good quality, non-dairy whipped topping can be a quick and easy substitute.
📝 Summary
Tres Leches is the ultimate shared dessert, offering a unique, spongy, and deeply creamy texture that wows every time. It’s a labor of love, but the smiles on your family and friends' faces are worth every minute of soaking and chilling!
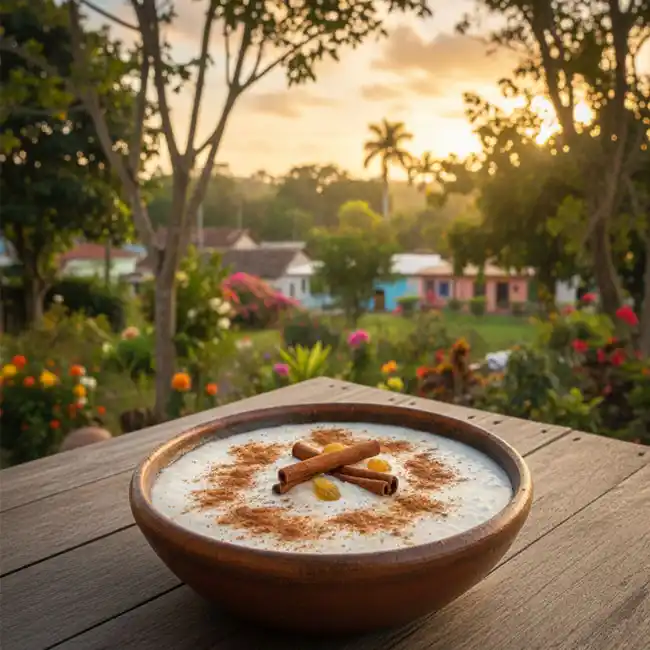
🍚 Recipe 2: Arroz con Leche – Spiced Panamanian Rice Pudding
🌴 About this Recipe: Creamy, Comforting, and Perfectly Spiced
Arroz con Leche (Rice Pudding) is the sweet, comforting cousin of sancocho. Every Panamanian household has its version, and it is the ultimate simple, soul-warming dessert. Panama's rice pudding is known for being incredibly rich, thick, and creamy, often achieved through the use of condensed or evaporated milk and a long, gentle simmer. Unlike lighter versions, this one is robust, usually heavily scented with cinnamon and often lime zest. It can be served warm for ultimate comfort or chilled for a refreshing treat.
📝 Ingredients & Measurements
For the Pudding:
• 1 cup of Short Grain White Rice: Short grain is best as it releases more starch, making the pudding creamier.
• 2 1/2 cups of Water: For the initial boiling of the rice.
• 3 cups of Whole Milk: The primary liquid base.
• 1 (12-ounce) can of Evaporated Milk: For a richer, deeper flavor.
• 1 (14-ounce) can of Sweetened Condensed Milk: To provide intense sweetness and thickness.
• 1/2 cup of Granulated Sugar: Adjust this to your taste, as the condensed milk is already very sweet.
• 1 large Cinnamon Stick: This is non-negotiable for authentic flavor.
• 1 teaspoon of Vanilla Extract: For a touch of smooth aroma.
• A pinch of Salt: To balance the sweetness.
• Optional: A handful of golden raisins.
For Garnish:
• Ground Cinnamon: For sprinkling on top before serving.
• Lime Zest: A small amount of freshly grated lime zest adds a signature Panamanian zing.
👩🍳 Step-by-Step Instructions
1.Rinse the Rice: Rinse the rice thoroughly under cold water until the water runs clear. This removes excess starch, which helps prevent the pudding from becoming gluey.
2.Initial Boil: In a large, heavy-bottomed saucepan, combine the rinsed rice and 2 1/2 cups of water. Bring to a boil, then immediately reduce the heat, cover, and simmer gently for about 10 minutes until the water is mostly absorbed.
3.Add Milk and Spices: Pour in the whole milk, evaporated milk, granulated sugar, the pinch of salt, and the cinnamon stick. Stir well to combine.
4.The Long Simmer: Bring the mixture to a gentle simmer (do not boil vigorously!). Reduce the heat to low and cook uncovered, stirring frequently to prevent sticking, for 30 to 40 minutes. The rice should be tender, and the mixture should be thick, creamy, and clinging to the rice grains.
5.Finish and Thicken: Remove the cinnamon stick. Stir in the sweetened condensed milk and vanilla extract. Cook for an additional 5 minutes, stirring constantly. Taste and adjust sugar if needed. If using raisins, stir them in now.
6.Cool and Serve: Pour the pudding into individual bowls or a large serving dish. Sprinkle generously with ground cinnamon and optional lime zest. Serve warm, or cover and chill for several hours to serve cold (it will thicken considerably as it cools).
🌟 Tips & Mistakes to Avoid
• Use a Heavy Pot: A heavy-bottomed pot is crucial to prevent the rice and milk mixture from scorching on the bottom, which ruins the flavor.
• Stir, Stir, Stir: You must stir often, especially as the pudding thickens, to ensure even cooking and prevent sticking. This stirring also encourages the release of starch for creaminess.
• Don't Rush the Simmer: The long, slow simmer is what makes the rice tender and allows the flavors of the cinnamon and milk to deeply infuse into the rice. Patience is key!
• Texture Check: If it seems too thick, add a splash more whole milk while it’s still warm. Remember it will always thicken more as it cools.
❓ FAQ
Q: Why do I need to rinse the rice?
A: Rinsing removes excess surface starch. If you don't rinse, the pudding can become overly gummy or gluey, rather than having the desired creamy, separated texture.
Q: Can I use long-grain rice?
A: You can, but it's not ideal. Short-grain rice (like Arborio or Pearl) releases starch more readily, resulting in a significantly creamier texture, which is the hallmark of great Arroz con Leche.
Q: Can I make this with less sugar?
A: Yes. Start by omitting the granulated sugar entirely and just use the sweetened condensed milk. Taste it after adding all the dairy, and only add the extra 1/2 cup of sugar if needed.
📝 Summary
Arroz con Leche is pure comfort food. It’s simple, economical, and the perfect recipe for a rainy afternoon or a sweet, shared ending to a family lunch. The creamy texture and deep cinnamon flavor are absolutely irresistible.

🥥 Recipe 3: Cocadas – The Tropical Coconut Candy
🏝️ About this Recipe: Chewy, Simple, and Naturally Tropical
Cocadas are the quintessential Panamanian sweet treat that captures the essence of the tropics in a bite-sized candy. Made primarily from shredded coconut, sugar, and often a dairy binder, these are simple, chewy confections that are perfect for making in large batches and sharing. They are commonly found in street markets and local bakeries. The texture is key: slightly chewy and golden on the outside, and moist and sweet on the inside. They are incredibly easy to make and transport you straight to a sunny beach!
📝 Ingredients & Measurements
For the Cocadas:
• 4 cups of Unsweetened Shredded Coconut: You can use sweetened, but adjust the sugar down dramatically. Unsweetened gives you more control.
• 1 (14-ounce) can of Sweetened Condensed Milk: The binder, sweetener, and primary source of creamy flavor.
• 1/2 cup of Granulated Sugar (or Panela / Brown Sugar): For extra sweetness and a slight caramelization on the outside.
• 1/2 teaspoon of Vanilla Extract: For aroma.
• A pinch of Salt: To balance the sweetness.
• 1/4 cup of Whole Milk (Optional): To moisten the mixture if it seems too dry.
• Zest of 1 Lime (Optional but Recommended): Adds a beautiful, tropical zing.
👩🍳 Step-by-Step Instructions
1.Prep the Mix: In a large, heavy-bottomed pot or Dutch oven, combine the shredded coconut, sweetened condensed milk, granulated sugar, vanilla extract, and salt. Add the optional lime zest now.
2.Heat and Stir: Place the pot over medium-low heat. Stir constantly and patiently. The goal is to heat the mixture and allow the sugar to melt and slightly caramelize the coconut, giving it a beautiful golden color.
3.Cook to Thickness: Continue cooking and stirring for approximately 15 to 25 minutes. The mixture is ready when it pulls away from the sides of the pot easily and is thick and sticky—almost like thick oatmeal. The color should have deepened to a nice, toasted gold.
4.Cool Slightly: Remove the pot from the heat and let the mixture cool for about 10 minutes. This makes it easier to handle and shape.
5.Shape the Cocadas: Line a baking sheet with parchment paper. Using a spoon or a small cookie scoop (or your hands, wetting them slightly to prevent sticking), scoop out uniform mounds of the coconut mixture onto the prepared sheet. Gently press them into compact mounds or small bars.
6.Set and Serve: Allow the cocadas to cool and firm up completely at room temperature for at least 2 hours, or place them in the refrigerator for faster setting. Once firm, they are ready to serve and share!
🌟 Tips & Mistakes to Avoid
• Don't Use High Heat: Keep the heat medium-low. High heat will burn the condensed milk and coconut, giving you a bitter flavor before the coconut has properly toasted. Patience is essential!
• Use the Heavy Pot: Just like the rice pudding, a heavy pot helps distribute heat evenly and prevents scorching, which is a common mistake with cocadas.
• Lime Zest is Key: If you want that bright, authentic tropical flavor that cuts through the intense sweetness, don't skip the lime zest. It makes a huge difference!
• If Too Dry: If your coconut seems overly dry and the mixture isn't coming together, add a splash of whole milk until it reaches the desired sticky consistency.
❓ FAQ
Q: Can I bake these instead of cooking them on the stovetop?
A: Yes, you can. You can scoop the mixture onto a baking sheet and bake at 350°F or 175°C for 15 to 20 minutes until the tops are golden brown. This results in a slightly drier, firmer cocada, but it is a quicker method!
Q: How do I store cocadas?
A: Store them in an airtight container at room temperature for up to a week, or in the refrigerator for up to two weeks.
Q: Can I add fruit?
A: Traditionally, they are plain, but some versions include dried fruit like raisins or candied pineapple mixed in before cooking. Just make sure the added fruit is chopped finely.
📝 Summary
Cocadas are the easiest and most fun Panamanian dessert to make! They are naturally gluten-free and pack a powerful, irresistible tropical punch. Perfect for sharing and an absolute crowd-pleaser!
🥳 Final Thoughts: Your Sweet Panamanian Adventure Awaits
Wow! You've just walked through three iconic and deeply satisfying Panamanian dessert recipes. See? Bringing the sunny, sweet flavors of Central America into your own kitchen wasn't difficult at all!
The beauty of these recipes—from the grand Tres Leches Cake to the simple, chewy Cocadas—lies in their commitment to comfort, creamy textures, and rich tropical flavor. They are recipes meant for celebration and connection, proving that the best food is always the food that is shared.
Our challenge to you is simple: Try one of these recipes this week! Maybe start with the comforting Arroz con Leche and then tackle the spectacular Tres Leches Cake for your next big event. Don't be afraid to experiment with the flavors—a little extra cinnamon here, a bit more lime zest there.
Once you master these Panamanian sweets, come back and share your experience! We'd love to hear which one became your family's new favorite. Happy baking, and happy sharing!
| 🇵🇦 🍨 < Back |