
🏠 Home > 🗺️ Recipes > 🥪 Appetizers > 🇨🇬 Congo Appetizers > 🥪 Mikate (African Beignets) , Dabo Kolo (Spicy Roasted Snack) , Crispy Yuca (Cassava)
🥪 Unlock the Flavors of Central Africa: 3 Simple Congo Appetizers You Can Make Today
Published by Supakorn | Updated: February 2026
Welcome to the Table: Your Easy Guide to Congolese Appetizers
Hey, food explorers! Ever wanted to take your taste buds on a trip to Central Africa? The Democratic Republic of Congo (DRC) and the Republic of the Congo (RC) are home to some of the most vibrant, heartwarming, and flavourful cuisines on the continent. While main dishes like Moambe (chicken in a rich palm nut sauce) or Pondu (cassava leaves stew) get a lot of international attention, the real unsung heroes are the appetizers and snacks. These are the bites that fuel the street-food scene, kick off a family meal, or just make an afternoon special.
In Congo, these small plates—known broadly as Makayabu or simple street fare—are a huge deal, and the best part? They’re incredibly easy to recreate in your own kitchen! You don't need a pantry full of rare ingredients or the skills of a Michelin-star chef, just a little patience and a big appetite.
This guide is your friendly, no-fuss introduction to making three of the most beloved and accessible Congolese appetizers. We’re talking about:
1.Mikate (African Beignets): Sweet, airy, and utterly addictive fried dough balls.
2.Dabo Kolo (Spicy Roasted Snack): A crunchy, savory, and lightly spicy dough snack.
3.Crispy Yuca (Cassava) Fries: The perfect savory fry alternative, often served with a killer dip.
Ready to roll up your sleeves and bring a taste of Congo to your kitchen? Let's get cooking!
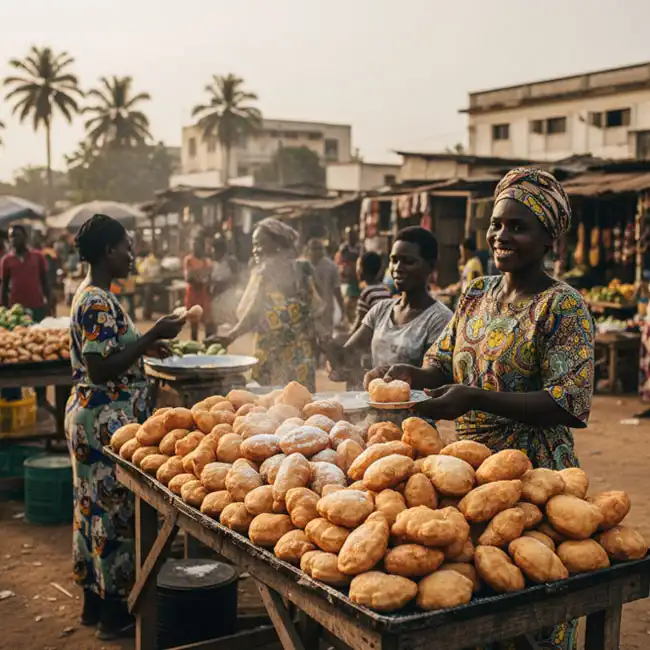
🔹 Recipe 1: Mikate – The Fluffy, Sweet African Doughnuts
About this Recipe: Sweet Bliss in a Bite
If you’ve ever had a French beignet, Mikate (also known as Puff-Puffs in West Africa) is its delicious, slightly chewier, and equally lovable African cousin. In Congo, these sweet, fried dough balls are an absolute staple. They are soft and airy on the inside with a beautiful, golden-brown crust. Often served as a breakfast treat, a dessert, or a sweet snack any time of day, they are simple comfort food at its best. The dough relies on a good yeast activation, which gives them that signature puff. You can serve them simply dusted with powdered sugar, or, if you're feeling fancy, with a side of a simple mango or passionfruit sauce.
Ingredients & Measurements (Makes about 20-25 Mikate)
- Flour: 4 cups (500g) all-purpose flour
- Sugar: 1 cup (200g) granulated sugar (you can reduce this if you prefer them less sweet)
- Yeast: 1 tablespoon active dry yeast
- Water: 1 ½ cups (350ml) lukewarm water
- Vanilla: 1 teaspoon vanilla extract (optional, but highly recommended)
- Salt: ½ teaspoon salt
- Oil: 4-5 cups of vegetable or neutral frying oil
Step-by-Step Instructions
1.Activate the Yeast: In a large bowl, whisk the yeast and 1 tablespoon of the sugar into the lukewarm water. Let it sit for 5-10 minutes until it becomes foamy. This is your cue that the yeast is active and ready to work!
2.Mix the Dry Ingredients: In a separate, even larger bowl, combine the flour, the remaining sugar, and the salt. Add the vanilla extract to the activated yeast mixture.
3.Combine and Mix: Pour the wet mixture into the dry ingredients. Use a sturdy wooden spoon or your hands to mix everything together vigorously. You want a smooth, thick, and slightly sticky batter. The traditional method involves mixing the dough by hand until air bubbles start to form and burst—this is a great arm workout! Mix for at least 5-7 minutes.
4.First Rise (Proofing): Cover the bowl with a clean kitchen towel or plastic wrap. Place it in a warm, draft-free spot (like a turned-off oven or microwave) and let the dough rise for 1 to 1.5 hours, or until it has doubled in size.
5.Heat the Oil: Pour your frying oil into a deep pot or fryer until it’s about 3 inches deep. Heat the oil to (350°F /175°C). It should be hot, but not smoking.
6.Fry the Mikate: Using your hands (oiling them lightly helps!) or two small spoons, carefully drop golf-ball-sized portions of the dough into the hot oil. Tip: Don't overcrowd the pot, as this will drop the temperature and make the Mikate oily.
7.Cook to Golden: Fry the Mikate for about 3-4 minutes, turning them frequently so they cook evenly on all sides until they are a deep, beautiful golden brown.
8.Drain and Serve: Use a slotted spoon to remove the fried dough and place them on a plate lined with paper towels to drain excess oil. Dust with powdered sugar while they are still warm and serve immediately!
Tips & Mistakes to Avoid
- Lukewarm is Key: If your water is too hot, it will kill the yeast. If it's too cold, the yeast won't activate. Think bath water temperature—just right!
- Be Patient with the Rise: Don't rush the proofing stage. A proper rise is crucial for light, airy Mikate. If your kitchen is cold, it might take a bit longer.
- Oil Temperature Matters: Oil that is too cool results in greasy Mikate. Oil that is too hot will brown the outside before the inside is cooked. Use a thermometer if you have one, or test with a tiny bit of dough—it should immediately bubble and float to the surface.
- For that Perfect Shape: Use slightly oiled hands. Scoop the dough in your palm and gently squeeze a portion between your thumb and forefinger to get a smooth ball shape before dropping it into the oil.
FAQ
Q: Can I make the Mikate dough ahead of time?
A: Yes, you can. After the first rise, you can punch the dough down, cover it tightly, and refrigerate it for up to 12 hours. Let it come back to room temperature for about 30 minutes before frying.
Q: My Mikate are dense/flat, what went wrong?
A: This is usually a sign of one of two things: either your yeast wasn't active (dead) or you didn't let the dough rise long enough. Make sure your yeast foams up before you mix the dough!
Q: What do you serve with Mikate besides sugar?
A: Try a simple fruit sauce (like puréed mango or pineapple), a drizzle of honey, or even a side of rich, hot chocolate for dipping.
Summary of Mikate
Mikate is the ultimate sweet introduction to Congolese street food. It’s a simple recipe that turns everyday flour, sugar, and yeast into a celebratory, warm, and comforting snack. Once you master the yeast and the oil temperature, you'll be making batches of these little golden delights on repeat!
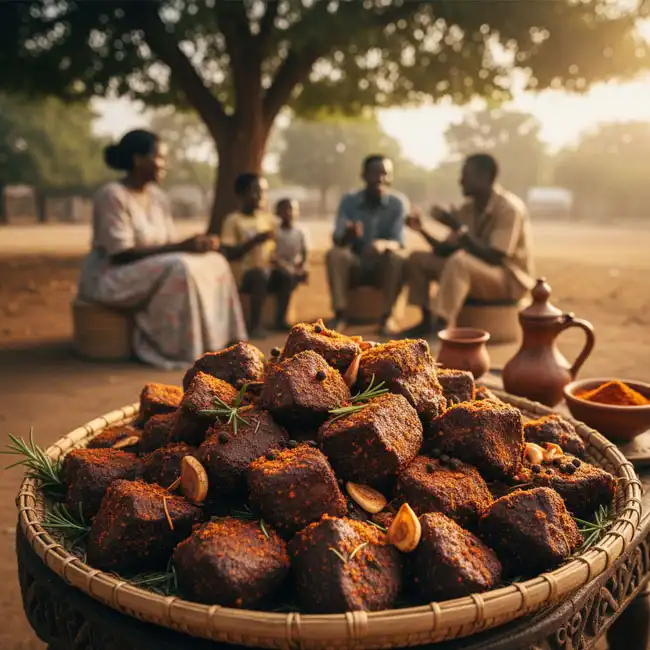
🔹 Recipe 2: Dabo Kolo – Crunchy, Spicy, & Savory Snack Bites
About this Recipe: The Ultimate Road-Trip Snack
Need a savory, crunchy, and slightly spicy snack to munch on? Meet Dabo Kolo. Hailing from the DRC and also popular in Ethiopia, this easy-to-make dough snack is like an African cracker. It's often prepared with just a handful of ingredients, cut into small, bite-sized pieces, and then toasted—not fried—making it a surprisingly light and wonderfully satisfying bite. It's the perfect pairing for a cold drink, or simply to enjoy while watching a movie. Its simple, salty, and spicy flavor profile is universally loved.
Ingredients & Measurements (Serves 4-6)
- Flour: 2 cups (250g) all-purpose flour
- Salt: 1 teaspoon fine salt
- Sugar: 1 tablespoon granulated sugar (to balance the salt/spice)
- Spice: 1 tablespoon of Cayenne pepper, Berbere spice, or chili flakes (adjust to your spice preference!)
- Oil: ¼ cup (60ml) vegetable oil (plus extra for mixing)
- Water: ⅔ cup (160ml) water
Step-by-Step Instructions
1.Combine Dry Ingredients: In a medium bowl, whisk together the flour, salt, sugar, and your chosen spice (Cayenne, Berbere, etc.).
2.Add Oil: Pour in the vegetable oil. Use your hands to rub the oil into the flour mixture until it resembles coarse crumbs.
3.Form the Dough: Gradually add the water, mixing with your hands until a firm, non-sticky dough forms. You may not need all the water. Knead the dough for about 5 minutes on a lightly floured surface until smooth and elastic.
4.Roll and Cut: Flour a dry, flat surface. Use a rolling pin to roll the dough out until it is about ¼ inch (0.6cm) thick.
5.Shape the Kolo: Using a sharp knife or a pizza cutter, cut the dough into small, roughly ½ inch (1.2cm) squares, strips, or diamonds. Small pieces are better for maximum crunch!
6.The Toasting (Cooking) Process: Heat a large, heavy-bottomed skillet or cast iron pan over medium heat with absolutely no oil or grease.
7.Dry-Roast: Add the dough pieces to the hot, dry skillet. Stir them occasionally with a wooden spoon or spatula. The heat should be low enough to prevent burning but hot enough to toast them thoroughly.
8.Cook to Perfection: Continue toasting and stirring for about 15-20 minutes, or until the pieces are crunchy, hard, and a deep golden brown. They should sound hollow when tapped.
9.Cool and Store: Remove the Dabo Kolo from the pan and let them cool completely on a tray. They will crisp up even more as they cool. Store them in an airtight container.
Tips & Mistakes to Avoid
- Don't Over-Hydrate the Dough: The dough should be firm and easy to handle, not sticky. This firm texture is what allows them to toast up perfectly crunchy. If it's too wet, add a little more flour.
- Keep Pieces Small: Smaller pieces get crunchier faster and more evenly. Larger pieces may remain chewy in the middle.
- Don't Rush the Toast: The dry-roasting step is the key difference between Dabo Kolo and fried chips. Low and slow heat ensures they dry out completely and become that signature crunchy texture without burning. Stir often!
- Spice is Yours: If you can't find Berbere spice (a traditional Ethiopian blend that works great), Cayenne pepper is the easiest substitute for that authentic heat. For a milder version, use smoked paprika and black pepper.
FAQ
Q: How do I store Dabo Kolo?
A: Store them in an airtight container at room temperature. Because they are dry-roasted, they keep very well for up to 2-3 weeks, making them a fantastic make-ahead snack.
Q: Can I bake Dabo Kolo instead of toasting?
A: Yes, you can. Spread the pieces on a baking sheet and bake at a low temperature (around 300∘F or 150∘C) for 30-40 minutes, flipping halfway, until they are hard and crunchy. This is less traditional but works well for large batches.
Q: What is a good dipping sauce for Dabo Kolo?
A: A popular pairing is a simple Spicy Peanut Dip. Mix smooth peanut butter with a little warm water, a pinch of salt, a dash of vinegar, and some chili sauce/paste until it reaches a dip consistency.
Summary of Dabo Kolo
Dabo Kolo is the perfect savory counterpoint to the sweet Mikate. It’s a testament to the fact that you don't need fancy equipment to create a deeply satisfying, flavourful snack. It’s crunchy, addictive, and a great way to bring a simple, authentic Congolese flavor to your appetizer spread.

🔹 Recipe 3: Crispy Yuca (Cassava) Fries – The Ultimate Savory Root Snack
About this Recipe: Fries with a Tropical Twist
Forget your regular potato fries for a minute—it’s time to try the ultimate Central African side-snack: Crispy Yuca Fries. Yuca (also called Cassava or Manioc) is one of the most important staple crops in Congo, used to make everything from the hearty Fufu paste to this delicious snack. When sliced into batons and fried, yuca develops a unique texture: incredibly creamy and tender on the inside, with a satisfyingly crispy, slightly chewier outside. They are a common street-side snack in the Congo, often served simply with salt and a side of peanuts.
Ingredients & Measurements (Serves 4)
- Yuca: 2 large yuca roots (about 2lbs or 1kg)
- Salt: 1 tablespoon of coarse salt, plus more for seasoning
- Water: Enough water to cover the yuca for boiling
- Oil: 4-5 cups of vegetable or neutral frying oil
Step-by-Step Instructions
1.Peel the Yuca: Yuca has a thick, waxy skin. Use a sharp knife to slice off the ends, then cut the root into 3-4 inch sections. Stand each section up and carefully slice downwards to remove the thick brown and pink layers, leaving only the white flesh.
2.Prep the Fries: Slice the peeled yuca lengthwise into thick batons, similar to steak fries. Look for and remove the woody, fibrous core that sometimes runs down the center of the root.
3.First Boil (The Key Step): Place the yuca fries in a large pot and cover them with cold water. Add the 1 tablespoon of coarse salt. Bring the water to a boil, then reduce the heat and simmer for 15-25 minutes. They are done when a fork can easily pierce them but they are not falling apart—they should be tender, not mushy.
4.Drain and Cool: Immediately drain the yuca and spread the pieces on a large tray or rack. Allow them to cool completely. This crucial step helps dry them out and prevents them from shattering when fried.
5.Heat the Oil: Pour your frying oil into a deep pot or fryer and heat it to 375°F / 190°C.
6.Fry to Crispness: Carefully lower the cooled yuca pieces into the hot oil. Fry in batches so the oil temperature doesn't drop too much.
7.Cook to Golden: Fry for about 5-7 minutes, turning occasionally, until the fries are beautifully golden brown and crispy on the outside.
8.Season and Serve: Remove the fries with a slotted spoon and place them on a paper towel-lined plate. Immediately sprinkle with a generous pinch of salt (or other seasoning) and serve hot.
Tips & Mistakes to Avoid
- Don't Skip the Peel: Yuca skin is not edible and must be thoroughly removed. The pinkish layer underneath the brown skin needs to go, too.
- The Boil is Essential: Boiling the yuca before frying is non-negotiable. It cooks the starchy interior, making it creamy and soft. If you skip this, your fries will be rock-hard and chewy.
- Let Them Dry/Cool: Frying hot, wet yuca is dangerous (splattering oil) and leads to soggy, oily fries. Letting them fully cool and dry out is vital for a perfect crispy crust.
- Season Immediately: Like all fries, Yuca Fries need to be seasoned the moment they come out of the hot oil so the salt can stick properly to the exterior.
FAQ
Q: Is yuca safe to eat? I heard it can be poisonous.
A: Yes, yuca is safe to eat once prepared correctly. The toxic compounds (cyanogenic glycosides) are concentrated in the peel and are broken down and leached out completely by peeling, chopping, and the necessary boiling step we use here. Store-bought fresh or frozen yuca is generally safe.
Q: Where can I buy yuca?
A: Look for it in the produce section of most large grocery stores, international markets, or Asian/Latin American specialty stores. It’s a long, brown, waxy root. You can also sometimes find it pre-cut and frozen, which is a great time saver (though the texture might be slightly different).
Q: What sauce do Congolese people serve with Yuca Fries?
A: Simple salt is common, but often they are served with a side of boiled or roasted peanuts for dipping/munching. Another great dip is the Spicy Peanut Dip mentioned above, or a classic, spicy Pili Pili chili sauce if you can find one.
Summary of Crispy Yuca Fries
Crispy Yuca Fries offer a satisfying change from the everyday potato. Their combination of a creamy interior and a robust, chewy exterior makes them incredibly addictive. As a staple food in Central Africa, mastering this simple frying technique is a great way to bring authentic, savory Congolese comfort food to your table.
Final Thoughts: Your Congolese Culinary Adventure Awaits!
See? That wasn't so tough, was it?
Congolese cuisine, much like its people, is vibrant, warm, and deeply comforting. Whether you're making the sweet and airy Mikate, the crunchy and spicy Dabo Kolo, or the savory and satisfying Yuca Fries, you’ve just proven that bringing these amazing flavours into your home is totally achievable, even for a total beginner.
The great thing about these recipes is their versatility. You can scale them up for a big party or just make a small batch for a snack. They are fantastic to eat on their own, but they truly shine when served together as a platter of contrasts: the sweet with the savory, the soft with the crunchy.
So, what are you waiting for? Pick a recipe—maybe start with the Mikate for a sweet treat, or jump straight to the Yuca Fries for a savory win—and give it a go. Don't be shy!
We’d love to hear about your culinary adventure! Snap a photo of your Mikate or tell us which of the Dabo Kolo spice variations you tried. Share your experience in the comments below! Bon Appétit!
| 🇨🇬 🥪 < Back |