
🏠 Home > 🗺️ Recipes > 🍞 Breads > 🇩🇰 Denmark Breads > 🍞 1.Homemade Low-Carb Denmark Breads
🍞 Why This Homemade Low-Carb Denmark Bread Will Change How You Think About Healthy Baking
Published by Supakorn | Updated: November 2026
🚢🦢 Introduction – Discover Homemade Low-Carb Denmark Breads: Authentic Danish Comfort Food
Hey friend, can we talk about bread for a second? Because I know exactly how this story usually goes. You decide to eat a little lighter, you start cutting back on carbs, and then suddenly bread becomes the enemy. You miss that warm, cozy smell in the kitchen. You miss tearing off a soft piece and spreading something delicious on top. You miss feeling full and happy after breakfast.
That is exactly why I fell in love with homemade low-carb Denmark breads.
In Denmark, bread is not just food. It is culture. It is hygge. It is that slow Sunday morning feeling when everyone sits around the table, the coffee is hot, the bread is still a little warm, and nobody is in a rush. Danish people take their bread seriously, from the dark, dense rugbrod that is served with open-face sandwiches to the soft, golden morning rolls that show up at every family gathering. When you travel through Copenhagen, Aarhus, or Odense, you will see bakeries on almost every corner, and you will smell fresh bread before you even see the shop.
What makes Danish bread so special is not just the taste. It is the texture, the heartiness, the way it makes a simple meal feel complete. It is nutty, a little tangy, a little chewy, and incredibly satisfying. And the best part? You do not have to give that up just because you want a better diet.
This recipe is my homemade version of that classic Danish comfort. It is a traditional-style loaf, reworked to be low in carbs, high in flavor, and super easy to make in your own kitchen. No fancy bakery equipment. No complicated techniques. Just real ingredients, a simple method, and a loaf that actually tastes like bread.
So grab your apron, preheat your oven, and let us bake this together. I promise, once you try this, you will never look at low-carb bread the same way again.
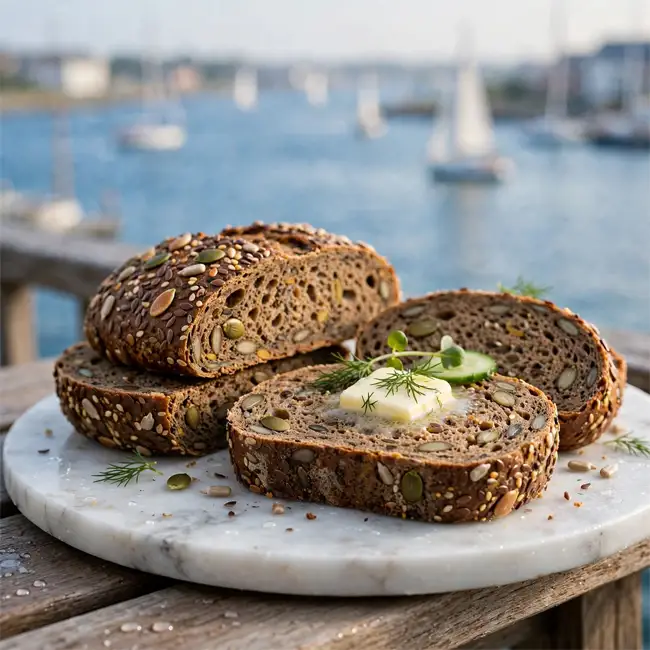
🧀 Authentic Homemade Low-Carb Denmark Breads Recipe
🥖 Culinary Background & Flavor Profile
Let us get one thing straight. A lot of low-carb breads out there taste like a compromise. They are dry, crumbly, a little eggy, and they make you wish you had just skipped bread altogether. This one is different.
This loaf is inspired by Danish rugbrod and Danish seed breads, the kind of bread that is meant to be hearty and nourishing. Imagine cutting into a loaf and seeing a beautiful, golden-brown crust with a soft, slightly dense crumb inside. You get a gentle nuttiness from seeds, a warm, toasty aroma from the oven, and a mild, savory flavor that works with almost anything.
The flavor profile is rich but balanced. It is not sweet. It is not bland. It is savory, earthy, and deeply comforting. The seeds add a lovely crunch. The almond flour keeps it moist. The psyllium husk gives it that real bread chew that most low-carb recipes miss completely.
The texture is the real star here. It slices cleanly. It toasts beautifully. It holds up to spreads, cheese, eggs, avocado, smoked salmon, or whatever you love to put on top. It does not fall apart. It does not feel like a diet food. It feels like real bread, because it is real bread, just made smarter.
If you have ever been to Denmark and had a proper open-face sandwich, you know the feeling. One slice is enough to make you feel satisfied. That is the goal here. A bread that is filling, flavorful, and friendly to your everyday diet.
🧂 Essential Ingredients & Precise Measurements
I have split the ingredients into three simple groups so you can prep everything in less than ten minutes. Please measure carefully, especially the psyllium husk and the baking powder, because those two ingredients control the texture more than anything else.
• For The Bread Base:
◦ Almond flour, finely ground: 2 cups, about 200 grams
◦ Golden flaxseed meal: 1 cup, about 100 grams
◦ Psyllium husk powder, finely ground: 5 tablespoons, about 35 grams
◦ Baking powder, aluminum-free: 2 teaspoons, about 8 grams
◦ Fine sea salt: 1 teaspoon, about 6 grams
◦ Garlic powder, optional for savory depth: 1/2 teaspoon, about 1.5 grams
• For The Seeds & Crunch:
◦ Sunflower seeds: 1/2 cup, about 70 grams
◦ Pumpkin seeds: 1/3 cup, about 45 grams
◦ Sesame seeds: 3 tablespoons, about 27 grams
◦ Chia seeds: 2 tablespoons, about 20 grams
◦ Whole flaxseeds, for topping: 1 tablespoon, about 10 grams
• For The Wet Mixture:
◦ Large eggs, room temperature: 4 eggs
◦ Warm water: 1 and 1/4 cups, about 300 ml
◦ Apple cider vinegar: 2 tablespoons, about 30 ml
◦ Extra virgin olive oil: 2 tablespoons, about 30 ml
◦ Plain Greek yogurt, full-fat: 1/4 cup, about 60 grams
A quick note about substitutions. If you cannot find golden flaxseed meal, regular brown flaxseed meal works too, it will just make the loaf a little darker. If you are nut-free, you can swap the almond flour for sunflower seed flour in the same amount, but keep an eye on the color, it bakes a little darker. Do not skip the psyllium husk powder. It is the secret ingredient that makes this bread hold together and slice like a real loaf.
👩🍳 Step-by-Step Cooking Instructions
Ready? This is the fun part. Take your time, follow the steps in order, and you will get a perfect loaf on your very first try.
✦ Step 1: Preheat and prep your pan. Preheat your oven to 175 degrees Celsius, about 350 degrees Fahrenheit. Line a standard 9 by 5 inch loaf pan with parchment paper, leaving a little overhang on the sides so you can lift the bread out easily. Lightly brush the parchment with a little olive oil.
✦ Step 2: Mix all the dry ingredients. In a large mixing bowl, whisk together the almond flour, flaxseed meal, psyllium husk powder, baking powder, sea salt, and garlic powder if you are using it. Make sure there are no lumps. This step is important because psyllium husk can clump if it is not mixed well.
✦ Step 3: Add the seeds. Stir in the sunflower seeds, pumpkin seeds, sesame seeds, and chia seeds. Mix until the seeds are evenly distributed throughout the dry mixture. You want seeds in every single bite.
✦ Step 4: Whisk the wet ingredients separately. In a separate medium bowl, whisk the eggs until they are light and a little frothy. Add the warm water, apple cider vinegar, olive oil, and Greek yogurt. Whisk again until everything is smooth and well combined.
✦ Step 5: Combine wet and dry. Pour the wet mixture into the dry mixture. Stir with a spatula or wooden spoon until you get a thick, sticky dough. It will look wetter than regular bread dough at first, and that is totally normal. Let it sit for 3 to 4 minutes. The psyllium husk and chia seeds will absorb the moisture and the dough will thicken up beautifully.
✦ Step 6: Shape and smooth. Transfer the dough into your prepared loaf pan. Use a wet spatula or wet hands to press it down evenly and smooth the top. Sprinkle the whole flaxseeds on top and gently press them in so they stick during baking.
✦ Step 7: Bake until golden and firm. Bake in the center of the oven for 55 to 65 minutes. The top should be deep golden brown and feel firm when you gently press it. If you tap the bottom of the loaf, it should sound hollow. If the top starts browning too fast after 40 minutes, loosely cover it with a piece of foil.
✦ Step 8: Cool completely, this is crucial. Remove the pan from the oven and let the bread cool in the pan for 10 minutes. Then use the parchment overhang to lift it out and place it on a wire rack. Let it cool completely for at least 1 hour before slicing. I know it is tempting, but if you cut it too early, the inside will be gummy. Patience here makes all the difference.
✦ Step 9: Slice and enjoy. Once fully cooled, slice with a sharp serrated knife. For the cleanest slices, use a gentle sawing motion instead of pressing straight down. Serve immediately or store as directed below.
💡 Chef's Pro Tips & Common Mistakes to Avoid
I have baked this loaf so many times, and I have made every mistake so you do not have to. Here are my honest, kitchen-tested tips.
• Use finely ground psyllium husk powder, not whole husks. Whole husks make the bread grainy and can leave purple spots. The fine powder gives you a smooth, bread-like texture.
• Do not skip the resting time after mixing. Those 3 to 4 minutes let the psyllium and chia do their magic. If you skip it, your dough will be too wet and your loaf will be flat.
• Measure your almond flour by weight if you can. Cup measurements can vary a lot depending on how packed the flour is. Weight is always more accurate for low-carb baking.
• Use room temperature eggs. Cold eggs do not mix as well and can make the bread denser. Just leave them on the counter for 20 to 30 minutes before you start.
• Do not open the oven door for the first 40 minutes. Low-carb breads are a little more sensitive to temperature drops. Let it set and rise undisturbed.
• Common mistake: Underbaking. This loaf is dense and moist, so it needs the full baking time. If you are unsure, bake it for 5 extra minutes. A slightly darker crust is much better than a wet center.
• Common mistake: Slicing while warm. I know, it smells amazing. But cutting early ruins the crumb. Let it cool completely, and your slices will be perfect.
• Common mistake: Using too much baking powder. More is not better here. Too much will make the bread taste bitter and collapse in the middle. Stick to the exact measurement.
• For extra flavor, toast the seeds first. If you have an extra 5 minutes, toast the sunflower and pumpkin seeds in a dry pan over medium heat until fragrant. It adds a deep, nutty flavor that is absolutely worth it.
• For a softer crust, store the loaf in a clean kitchen towel overnight. For a crispier crust, store it uncovered for the first few hours and then wrap it. You can choose your favorite texture.
🍽️ Pairings & Serving Suggestions
This is where your Danish bread really shines. In Denmark, bread is served as the base for beautiful open-face sandwiches called smorrebrod. You do not need anything fancy, just good ingredients and a little creativity.
• For breakfast: Toast a thick slice and top it with scrambled eggs, sliced avocado, and a sprinkle of chili flakes. Add a cup of hot coffee or herbal tea on the side and you have a perfect slow morning.
• For lunch: Make an open-face sandwich with cream cheese, smoked salmon, cucumber, fresh dill, and a squeeze of lemon. Or go classic Danish with sliced cheese, tomato, and fresh herbs.
• For a light dinner: Serve warm slices alongside a hearty vegetable soup, a fresh salad with cucumber and radish, or grilled chicken with roasted vegetables.
• For snacking: Spread it with almond butter and sliced strawberries, or with hummus and roasted peppers. It is filling enough to keep you satisfied for hours.
• For drinks: Pair it with sparkling water with lemon and mint, iced herbal tea, unsweetened iced tea, or a warm cup of chamomile tea. The clean, fresh flavors let the nutty bread stand out.
• For a cozy hygge moment: Serve it on a wooden board with a selection of cheeses, sliced cucumbers, olives, and fresh fruit. Invite your friends over, light a candle, and enjoy the moment. That is the true Danish way.
🌧️❓ Frequently Asked Questions (FAQ)
Q1: How long does this homemade low-carb Denmark bread stay fresh?
This bread stays fresh at room temperature for 2 to 3 days if stored in an airtight container or wrapped in a clean kitchen towel. In the refrigerator, it lasts for up to 7 days. For longer storage, slice it first, freeze the slices in a freezer bag, and toast them straight from frozen whenever you want a quick slice.
Q2: Can I make this bread without eggs?
Eggs play a big role in structure and moisture here, so I do not recommend removing them completely. If you need an egg-free version, you can try using a flax egg for one of the eggs, but the texture will be denser. For best results, keep the eggs as written in the recipe.
Q3: Is this bread suitable for a keto-friendly diet?
Yes, this recipe is naturally very low in carbs and high in healthy fats and fiber because it uses almond flour, flaxseed, seeds, and psyllium husk instead of wheat flour. The exact carb count will depend on the brands you use, so always check your ingredient labels if you are tracking your intake closely.
Q4: Can I bake this in a different pan or as rolls?
Absolutely. You can divide the dough into 8 to 10 small rolls and bake them for 30 to 35 minutes, or use a round cake pan for a round loaf. Just keep an eye on the baking time. Rolls bake faster, so start checking them after 25 minutes.
📋 Recipe Quick Summary
• Prep Time: 15 minutes
• Resting Time: 4 minutes
• Cook Time: 55 to 65 minutes
• Cooling Time: 60 minutes
• Total Time: About 2 hours and 15 minutes
• Servings: 12 slices
• Cuisine: Danish-inspired, low-carb, homemade
• Best For: Breakfast, open-face sandwiches, healthy everyday diet, meal prep
• Storage: Room temperature 2 to 3 days, refrigerator up to 7 days, freezer up to 2 months
✨ Final Thoughts & Kitchen Inspiration
See? Baking an authentic-style international bread at home is not hard at all. It does not require years of training or a professional bakery. It just requires good ingredients, a little patience, and the willingness to try something new.
This homemade low-carb Denmark bread is proof that eating for a better diet does not mean giving up the foods you love. You can still enjoy warm bread, cozy breakfasts, and satisfying sandwiches. You can still feel that hygge feeling in your own kitchen, no matter where you live in the world.
I would love for you to make this your own. Add more seeds if you love crunch. Add a little rosemary or thyme if you love herbs. Make it a little spicier. Make it your signature loaf. Then share it with someone you love, because bread is always better when it is shared.
If you bake this, leave a comment and tell me how it turned out. Did you toast it? Did you make smorrebrod? Did your family love it? I read every single message, and your stories are my favorite part of sharing recipes.
Happy baking, friend. Your kitchen is about to smell amazing.
🏛️ Culinary Heritage & Cultural Credit to Denmark
Before we finish, I want to take a moment to honor the real origin of this inspiration.
Danish bread culture goes back centuries. In Denmark, bread has always been more than a side dish. Rugbrod, the famous Danish rye bread, has been a staple of Danish tables since the Middle Ages. It was baked in farmhouses, shared at family meals, and carried by workers as a nourishing, filling food that could sustain a long day. Over time, Danish bakers became known across Europe for their craftsmanship, their respect for fermentation, and their love of whole grains and seeds.
The tradition of smorrebrod, the beautifully arranged open-face sandwich, grew out of this bread culture. It is not just about putting toppings on bread. It is about balance, beauty, and respect for simple ingredients. Danish home cooks and professional bakers alike treat bread as something worthy of care and pride.
This recipe is not claiming to be an exact historical rugbrod. It is a modern, homemade adaptation inspired by that heritage, made with low-carb ingredients so more people can enjoy the spirit of Danish baking today. I share it with deep respect and gratitude for Danish bakers, home cooks, and families who have kept this wonderful bread tradition alive for generations.
If you ever get the chance to visit Denmark, please do yourself a favor. Walk into a local bakery early in the morning, order a fresh roll, sit by the window, and watch the city wake up. That is the feeling I tried to bring into this recipe. And now, you can taste a little piece of it in your own kitchen.
| 🇩🇰 🍞 < Back |